So I've rattled on quite a bit here about our Kitchen Renovation. It was a project that was LONG overdue... the kitchen desperately needed to be redone when I first bought the house in 2007... but things happen, and for 6 years fixing the kitchen kept getting pushed to the back burner. But finally, this summer, we took the plunge and just did it! It was quite an experience, taking on a renovation like this, and I learned A LOT. We had a lot of things that needed to be done (updating electrical and plumbing, replacing the falling-apart cabinets, taking care of damage done by animals getting into our walls through our previously rotten eves, replacing the subfloor and floor, etc) and a lot of things we wanted to have done (taking down a wall to give us more space, taking down a drop ceiling, putting in a built-in bookshelf, repainting, etc) We also had a limited budget to work within. This was where the real challenge came in. We started by making a list of everything that we would absolutely needed to do, and all the things we would like to have, if we could. We then set about figuring out how to get that list down to a something that would reasonably fit our budget. We made sure to allow a little bit of "wiggle room" in the budget, in case of unexpected surprises (all too common, in old homes!) We were very lucky to find a great contractor who was willing to work with us to help make this dream a reality. By forgoing some "unnecessary" things, going with some cheaper options in flooring, lighting, counters and cabinets, and by doing as much of the work as possible ourselves, we did manage to find a way to get a great kitchen within our budget. Here are some photos of our 9 week adventure:
 |
"before" photo of the large window, with an awkwardly-placed
radiator cover. This always bugged me! |
 |
| In the midst of demolition. It was fun finding all the old wallpaper! |
 |
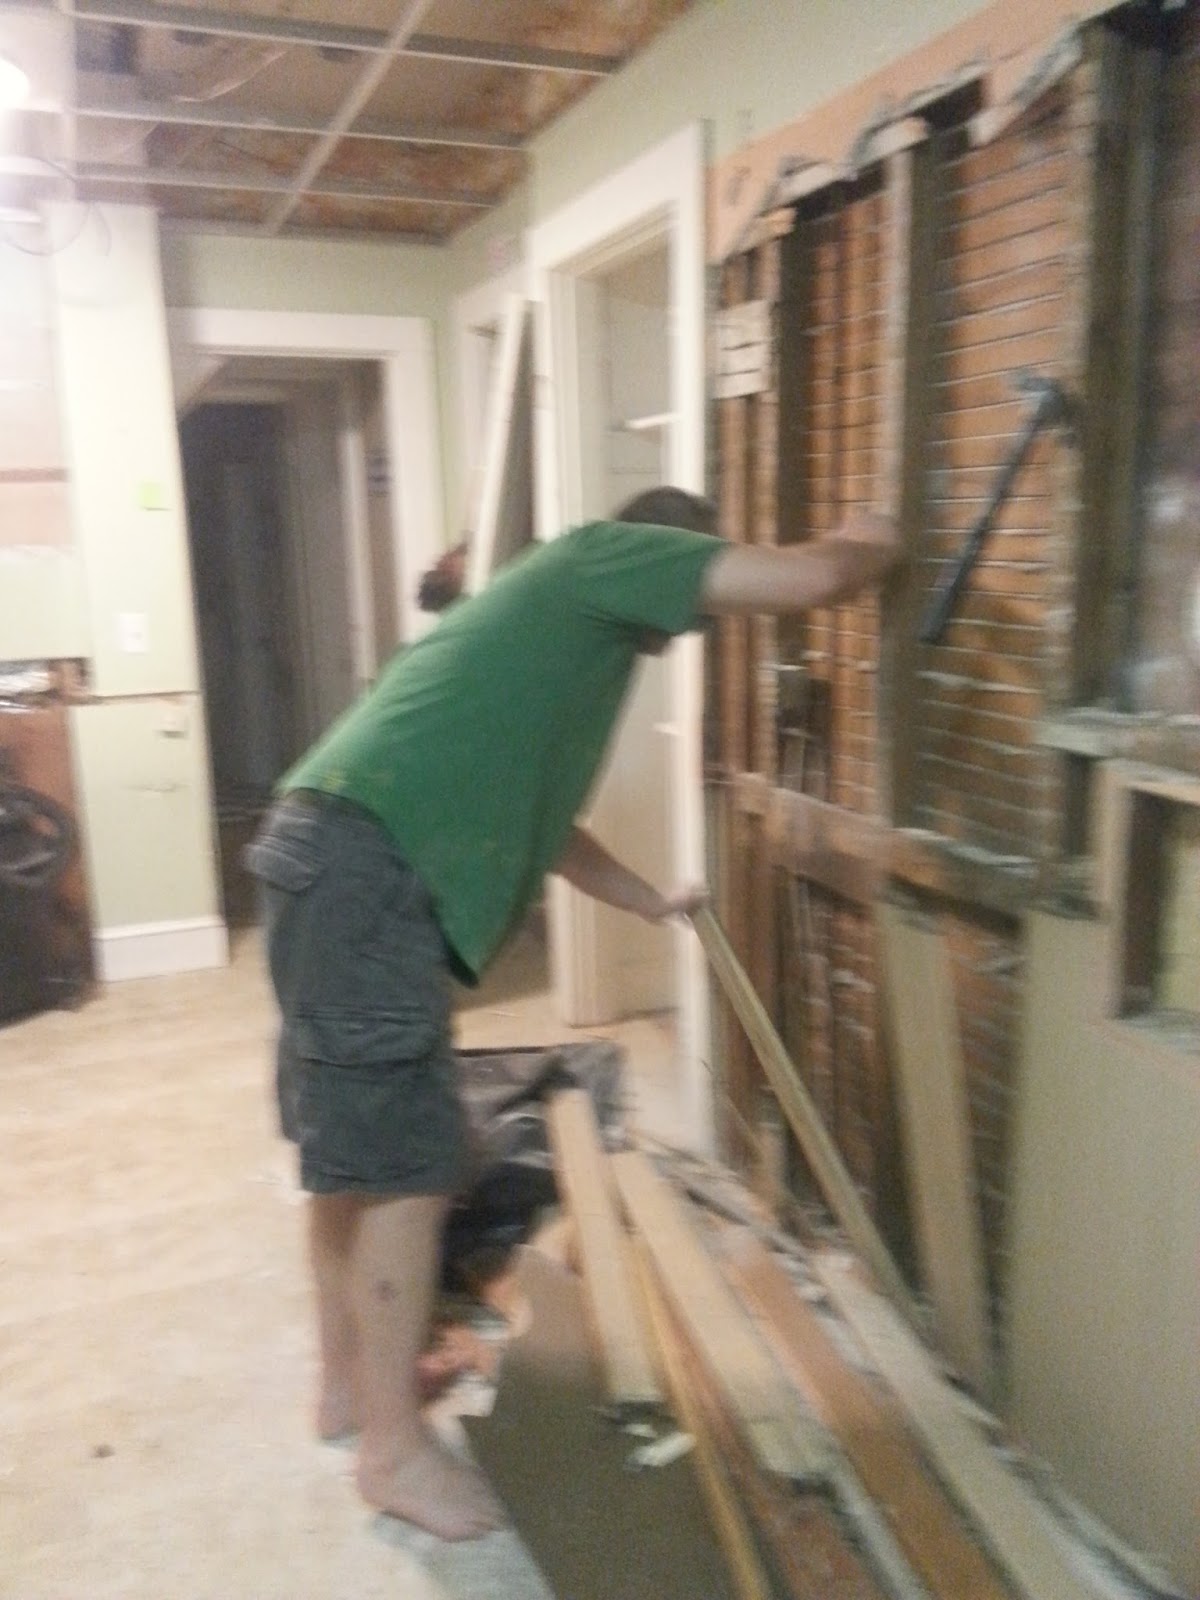
| The Man, taking down the center wall |
 |
| The center wall, down to the studs. |
.jpg) |
Where the center wall once was! We have a column
at the chimney, and a very useful island. |
 |
| FINISHED!! View from the kitchen doorway, looking right. |
 |
| View from our homeschool area |
 |
| Add caption |
 |
View from the homeschool area, looking toward the dining area.
Notice the large window... we put in a built in bookcase next to
the old awkardly-place radiator. Much more visually pleasing! |
 |
| View from the dining area, looking toward the homeschool area. |
 |
| corner between the stove and the doorway. |
I am SO happy how this renovation came out. The kitchen is the heart and soul of our home, and our family truly LIVES in this room. It was well worth every penny spent and every hour of work!
By the way... you can see detailed posts about the
homeschool area and our
Command Center Wall here and
here.
Next post... a fun DIY wall art project, using an old window!


.jpg)


This comment has been removed by a blog administrator.
ReplyDeleteI am very enjoyed for this blog. I feel strongly about it and love learning more on this topic.
ReplyDeleteIf possible, as you gain expertise, would you mind updating your blog with more information? It is extremely helpful for me.
I know something information, to know you can click here
bathroom renovations ipswich
ipswich bathroom renovations
I am planning on renovating my kitchen, I love what did to your kitchen i cant wait to put your ideas on my kitchen i love what you did from the cabinets, walls, splashbacks, lightning etc.
ReplyDeleteI cannot believe the before and after photos of your kitchen! You did an amazing job with this remodeling project. I like how you knocked down the center wall and replaced it with a kitchen island. My wife pointed out the chalkboard and basket on the wall, so I think we will be borrowing that idea for our own kitchen very soon.
ReplyDeleteHi! Thank you for posting these pictures! I grew up in this house . I am one of the McCauley's! The reason the radiator in the kitchen looked awkward is that there was a normal sized window in that spot before. My mom chopped a bigger hole and put in the picture window , because of the view. Also, she installed the cabinets and we are the ones that put up that wallpaper....so happy to see that you have made a blog about the house that is so dear to me...
ReplyDeleteOh wow, thanks for commenting! I'm so glad you approve of what we've done to your childhood home. We bought the house 10 years ago from the people who were here after your family... they made a few changes while they lived here (from 1987-2007) and we've done quite a bit since we've been here, including new windows updating the bathrooms, and fixing up the in-law in the basement. We've tried to keep the integrity of the house while doing the updates... we love the charm and history of this home :)
DeleteI have shared your blog with my family .It is such a treasure to be able to see all of it. I love everything that you have done to the house! It was a great place for kids to grow up. Just to let you know, the reason the kitchen /dining room was an odd U shape is that my mom covered up the doorway in the end of the dining room,that opened up into the hallway near the porch door! She also covered over the doorway at the back end of what we called the family room , leading to the hall where the porch door is. So the house was all open and had a nice flow to it. She made these changes to save on oil as it kept those areas isolated. If you wanted to knock down those areas the door frames are still there, I think!
DeleteThe door frames are still there... found them when I pulled out the paneling in the back hall! (we put up drywall and beadboard wainscoting) I ended this blog in 2016, but the house has continued to evolve. We just repainted the livingroom and are in the process of putting in new windows there (we've been slowly replacing the old windows with new energy-efficient ones... the livingroom ones are the last to go!) The next projects on the list are to finish upgrading the electrical system, and to maybe redo some of the floors, as the old hardwood is in rough shape in spots. If you're still living in the area, I'd happily give you a tour sometime. Feel free to email me!
Delete