Before I quit my job, I kept thinking about all the free time I would have once I wasn't working full time. But a funny thing happened, which is that since my last day of work I have been busier than ever. I get up between 5:30 and 6am, and I'm going-going-going all day long. I was talking about this with my friend Kristen, and she said it's like when you find yourself with an empty cabinet... you always manage to fill it up with stuff. I thought that was a perfect comparison!
Although my days are really busy, my life is vastly different than it was before. Prior to quitting my job (a very demanding, high-stress job) I felt like I was constantly being pulled in all directions. I was always worried that my kids weren't getting enough of my time, I hated that I didn't have time for creative pursuits and that I sometimes couldn't keep up with home tasks the way I'd have liked to. There were ALWAYS things I was supposed to be doing, whether it was stuff for work, stuff for the kids homeschooling or stuff around the house. I just couldn't ever seem to get everything done, no matter how early I got up and how many hours I worked. Because I felt so stressed, I was often short and grumpy with those I love, and that was not something I felt good about. I had a tremendous amount of guilt, that I was not "good enough" at my job, as a mom or as a partner.
Since quitting my job, there is a huge, noticeable absence of stress in my life. While I was working full-time, the stress was constant and menacing, and now, stress is but an occasional, temporary annoyance. I think there are several reasons for this. First of all, I no longer feel like I'm short-changing my kids. That was the hardest part of my former job... that it took so much of me, that there was little left for my family. I wanted to give more to my kids, and now, I can. In less than a month, I'm already feeling a big difference in my relationship with my kids.
So what am I doing to fill up my days, now that I'm not running a daycare? Well...
I've become much more active in my kids homeschool group.
I'm spending more time helping the kids with their schoolwork.
I'm driving my kids to lots and lots of classes, field trips and extra-curricular activities.
I'm making time to write, every single day.
I'm teaching an art class, and making plans to teach more classes in the future.
I'm taking care of my home and family, mindfully and happily.
Yes, I'm busy, but mostly I'm busy doing things I WANT to do (like actively parenting, writing every day, making and teaching Art) and not things I HAVE to do (like endless tedious daycare paperwork and payroll taxes) Such a difference.
I think there is a lot of truth in the old saying, "If Mama Ain't Happy, Ain't Nobody Happy." And right now, I am Happy. I feel SO incredibly Blessed and lucky to have been able to do this.
Life. Is. GOOD.
Thursday, September 25, 2014
Tuesday, September 23, 2014
Happy Autumn! (and a recipe!)
 |
| Wee pumpkins on our mantle, for Fall |
But this brings me to the recipe I want to share! I had been planning to make my favorite creamy vegan pumpkin soup for our feast, but we had a full day of homeschool classes and such which had me out of the house until 5:45pm, so I feared I wouldn't have time to make it. So I decided to try making the pumpkin soup in the crock pot, immersion blender, added a can of coconut milk and it was good to go. It took me another five minutes to toss together the salad and slice the bread while the kids set the table, and dinner was ready by 6. I'm pretty sure that the combination of the crock pot and the immersion blender are going to change the way we make dinner here at the homestead. I'm imagining myself making all sorts of delicious crock pot soups and stews to get us through the winter.
and I'm SO glad I did! It really worked out well. I just tossed everything into the crock pot in the morning, and it simmered all day while we were going about our day. At dinner time I just pureed it right in the pot with my recently-acquired
Crock Pot Pumpkin Soup
2 medium onions, chopped in chunks
1 Tbsp olive oil
Good-sized sugar pumpkin, peeled and cut into chunks
4 cups vegetable broth
1 teaspoon ground cumin
2 teaspoons curry powder (add more or less, depending how spicy you like it)
1 can of coconut milk
Salt and pepper to taste
Put the crock pot on high, and toss in the onion and olive oil. Let cook until it starts to soften, stirring every so often while you prepare the pumpkin. Add the pumpkin, broth and spices, and set crock pot to low. Simmer for 6-8 hours, or until everything is soft.
When it's time for dinner, use an immersion blender to puree the soup (or you can puree it in a regular blender, in small batches) Add the coconut milk and adjust the seasonings, if necessary. Serve with a big salad and crusty bread.
Sunday, September 21, 2014
Room Reveal: The New Living Room!
At long last... we're ready to reveal our new living room! As I mentioned last post, we have had all sorts of snags and challenges getting this room put together. As a result, it was not quite the frugal redo we'd hoped for. Oh well. But it could have been MUCH worse, so we're just going to focus on the positive, which is that we now have a nice new comfortable room to relax and entertain in.
Here's an overview of what went into this room:
- Stripped off old wallpaper (a nightmare of a task... so glad that's over!)
- Repaired, primed and painted walls a soft gold. Took two tries, as the first color was more bright mustard yellow than soft gold. Lesson learned: always do a test patch, and do not rely on the tiny paint chip to give you a true idea of how the color will look on your wall.
- Rug brought up from basement.
- Faux fireplace updated
- New sofa, chairs and curtains purchased at Ikea
- Ceiling fan and light fixture from Home Depot
- Old knob and tube wiring replaced by electrician
- New pillows purchased at Homegoods and Christmas Tree Shops
- Cushions purchased from Overstock.com
- Candles purchased from Homegoods
The rest was stuff we had already. Much of what is in this room are family heirlooms and special things I've collected over the years. I enjoy being surrounded by this eclectic assortment of the "this and that" of life.
And now... for pictures!
 |
| Here is the alcove by the front door. This chest belonged to my paternal grandmother, and the doily was crocheted by my maternal grandmother. The twigs and hydrangea are from our garden, and the painting is from when I had fun "pain night" with some friends. |
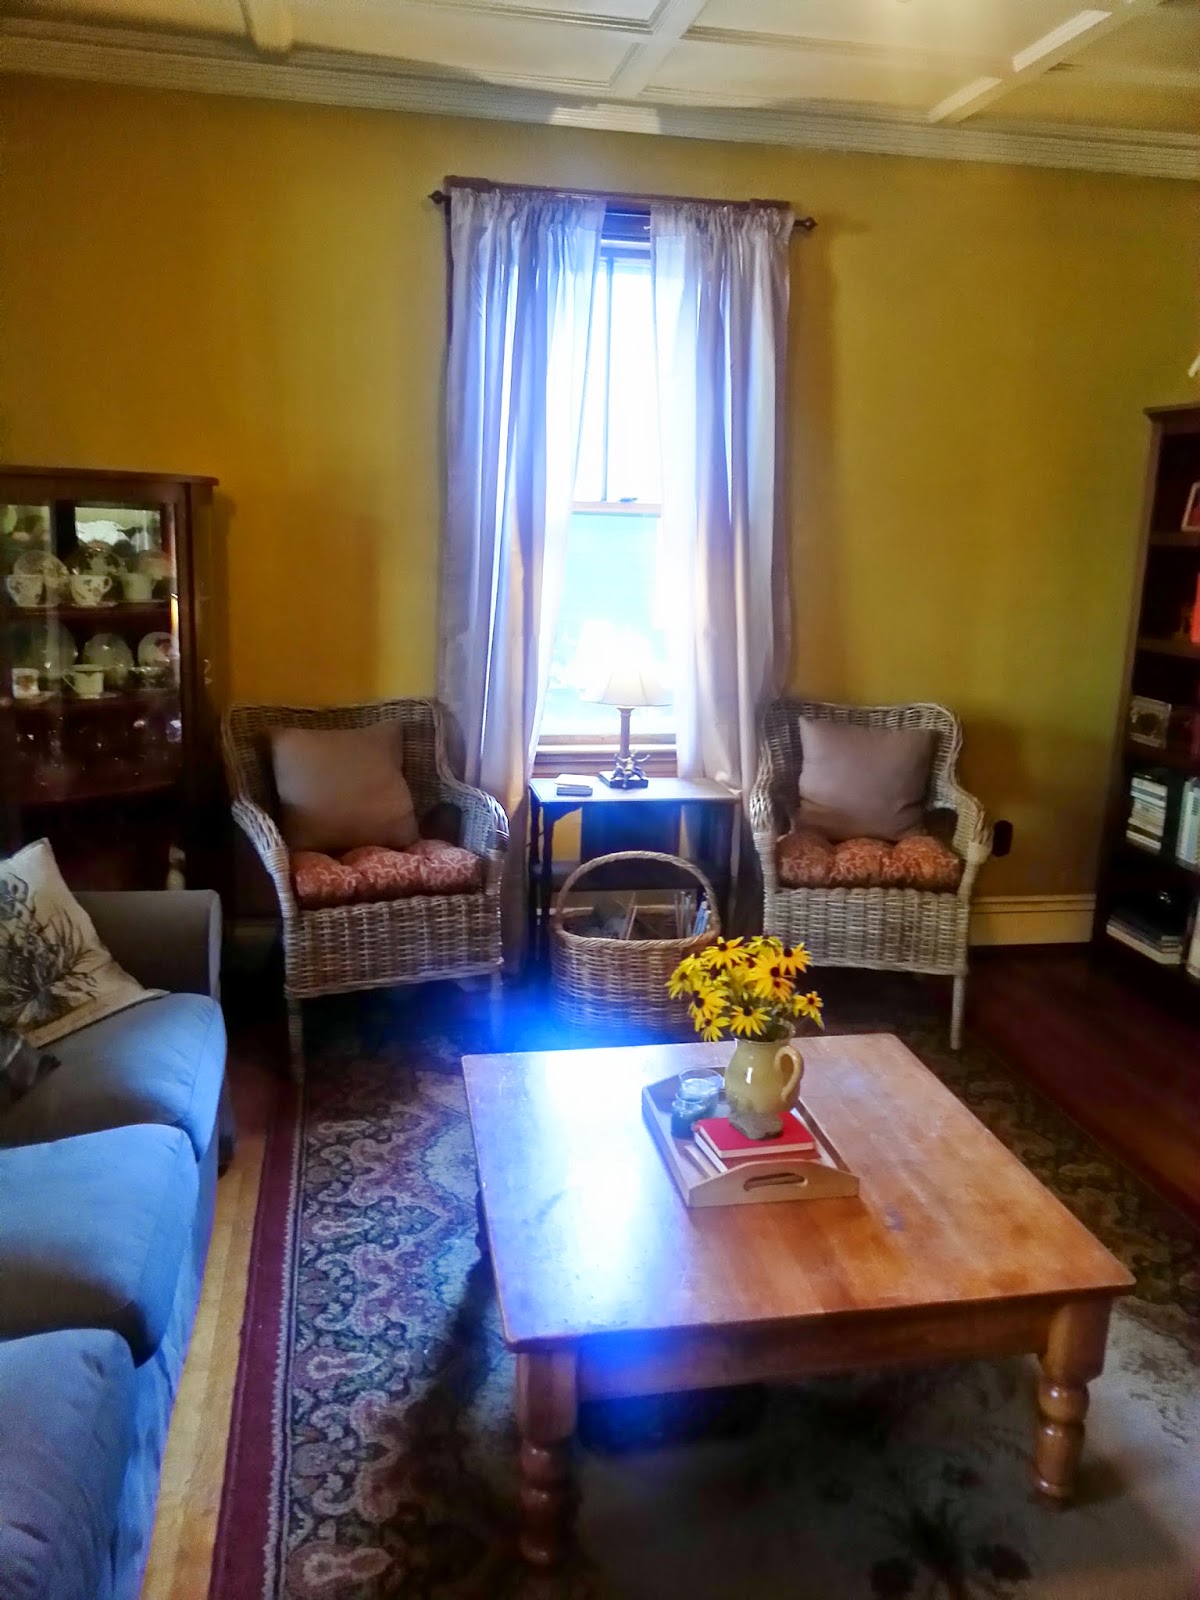 |
| New chairs, from Ikea, with anantique side table in between. My sister found this table in the trash about 25 years ago. My knitting basket sits in front. The coffee table has kicked around my home in various rooms for a good many years. |
 |
| On the left, Ikea Ektorp sofa, with my old antique china cabinet in the corner. The cabinet is filled with my grandmother's tea cup collection, and my great grandmother's collection of pink depression glass. |
 |
| Another photo of the Ikea chairs. I really do like the texture they bring to this room, and I love how they take up less space than upholstered chairs would. |
 |
| I love my new sofa! Ikea is the best. Cheap, pretty and comfy. On the floor next to the sofa is an old piece of driftwood that the cats like to use as a scratching post. |
 |
| The fireplace wall. Many of the antique books on the shelves belonged to my grandfather. The serving pieces on the mantle were my grandmother's, and the wine bottle with twigs was from my recycle bin. The assortment of candlesticks and candles were a big splurge purchase, from Homegoods. Some were on clearance, some were not, but I do love the way the fill the fireplace area. |

 |
| The piano wall and the front door. Still working on this area, as I would like to accessorize the piano a bit more. I would like something on the right of the piano, to balance out my fabulous thrift shop monkey lamp on the left. The large antique painting was given to me by a friend many years ago. |
I especially like the way this room looks in the evening...


I don't really consider this room "done" as I know it will continue to be a work in progress. But for now, I'm enjoying being in this space, and I look forward to getting the chance to spend time this room with family and friends.
Thursday, September 18, 2014
Faux Fireplace Revamp and Living Room Update
I've mentioned a few times recently that we're in the process of redoing our living room, for the first time since I moved here 7+ years ago. Seriously, this room was in dire need of some love. It had old nasty wallpaper on the walls, the same "old lady" curtains that came with the house and a hideous 70's light fixture. It was not a very nice room to be in.
It also has a fireplace, which had been boarded up at some point. There is definitely a chimney there, so we were thinking it would be cool to open up the wall and see what was going on in there. We thought maybe we'd have the chimney looked at, and if it was good, we'd put in one of those efficient fireplace inserts to help reduce our heat bills in the winter.
But when we began to open up the wall, we found this:
It was not a boarded up fireplace, it was a faux fireplace. There was, indeed, a chimney there, and an opening where at one point there must have been a wood or coal stove, but that was boarded up and a faux fireplace mantle was put up in it's place. So, no fireplace insert for us. Oh well.
Instead, we decided to just fix up the mantle and really make this faux fireplace a nice focal point for the room.
As of now, the rest of the room is ~thisclose~ to being finished. We had SO many setbacks with this room project. Issues with wallpaper and horsehair plaster walls (never a good combination) paint that was the wrong color, and worst of all, an epic electrical issue. We tried to replace an ugly ceiling light with a fan, and when The Man took down the old light, he found this:

It also has a fireplace, which had been boarded up at some point. There is definitely a chimney there, so we were thinking it would be cool to open up the wall and see what was going on in there. We thought maybe we'd have the chimney looked at, and if it was good, we'd put in one of those efficient fireplace inserts to help reduce our heat bills in the winter.
But when we began to open up the wall, we found this:
 |
| Oops. No fireplace :( |
Instead, we decided to just fix up the mantle and really make this faux fireplace a nice focal point for the room.
 |
| We re-boarded up the opening, and replaced posts which were inexplicably removed by previous owners, leaving obvious holes in the floor. |
 |
| We also added some tile to the floor, to make it seem more "fireplace-like" |
 |
| Almost finished! Now for accessories... |
That there is some old knob and tube wiring, not legal in many decades. The electrician we called suspects it was original to the house (which was built in 1895) so obviously this was a major safety issue. We are in the midst of having that whole mess cleaned up and redone, and new fixtures installed. This was an unexpected expense, for sure, but better to have caught it before it caused a fire. The electricians should be finishing up tomorrow, so hopefully I'll have a "room reveal" post up for the weekend!
Sunday, September 14, 2014
Room Reveal: Our New "Big Kid" Playroom!
Last post, when I showed you my new home office, I promised to show off another of our three new rooms... our Big Kid Playroom!
This room underwent quite a transformation. It used to be our main daycare space. With the closing of our daycare, we were finally able to create a playroom for my kids. We don't have a whole lot of bedroom space in this house. With five kids' beds in two small bedrooms, there isn't much space for toys, so creating a space for them to hang out and play in was a real priority for us.
Now that our kids are a bit older (ages 9 up to teens) our play space needs are a bit different than when they were younger. The kids and I talked a lot about what they would like to have in the room and how they imagined using the room. They asked for things like space to draw and do art, space to display their lego creations, space to play games, and comfortable places to sit and read. They didn't want the room to seem to "babyish" but they still wanted it to be fun. I had some priorities for the room, too. I wanted a space where all the kids could feel comfortable hanging out together, and I wanted it to be easy to keep tidy. I also wanted to spend as little as possible putting the room together. (More on that below!)I'm happy to say that we ended up with a room that met all of this criteria and more.
Here are some shots of the room BEFORE... when it was a daycare room:


And now... here is the room AFTER... Our new Big Kid Playroom!
Because we're on a tight budget, it was important that we put this room together for as little cash as possible. We were able to recycle lots of stuff from this room's previous life, as well as pulling in some things from other rooms in the house. The rug and furniture used to be in our living room, and the chairs were in our kitchen before we renovated in there. The small corner table was in our basement, and the cork in the frames was leftover from a prior project. The only elements we had to spend money on were paint, the table (second hand, $40) curtains (Overstock.com, $16) lamp (Target, $24) and pillows (Christmas Tree Shops, around $18) The total cost to put together this room was around $150. Not too shabby!
This room underwent quite a transformation. It used to be our main daycare space. With the closing of our daycare, we were finally able to create a playroom for my kids. We don't have a whole lot of bedroom space in this house. With five kids' beds in two small bedrooms, there isn't much space for toys, so creating a space for them to hang out and play in was a real priority for us.
Now that our kids are a bit older (ages 9 up to teens) our play space needs are a bit different than when they were younger. The kids and I talked a lot about what they would like to have in the room and how they imagined using the room. They asked for things like space to draw and do art, space to display their lego creations, space to play games, and comfortable places to sit and read. They didn't want the room to seem to "babyish" but they still wanted it to be fun. I had some priorities for the room, too. I wanted a space where all the kids could feel comfortable hanging out together, and I wanted it to be easy to keep tidy. I also wanted to spend as little as possible putting the room together. (More on that below!)I'm happy to say that we ended up with a room that met all of this criteria and more.
Here are some shots of the room BEFORE... when it was a daycare room:
And now... here is the room AFTER... Our new Big Kid Playroom!
 |
| The sitting area, with an art display wall behind the loveseat. The frames have cork inside, so the kids can change the art in the frames easily. |
 |
| The chalkboard wall, game shelf and table for crafts and games. The built-in on the right of the chalkboard wall holds Legos. Lots and lots of Legos. |
 |
| Storage for toys and books. |
 |
| Our art cabinet. We do keep a ridiculous amount of art supplies, I know. The baskets store larger items, such as large bottles of paint and glue, palettes, etc. |
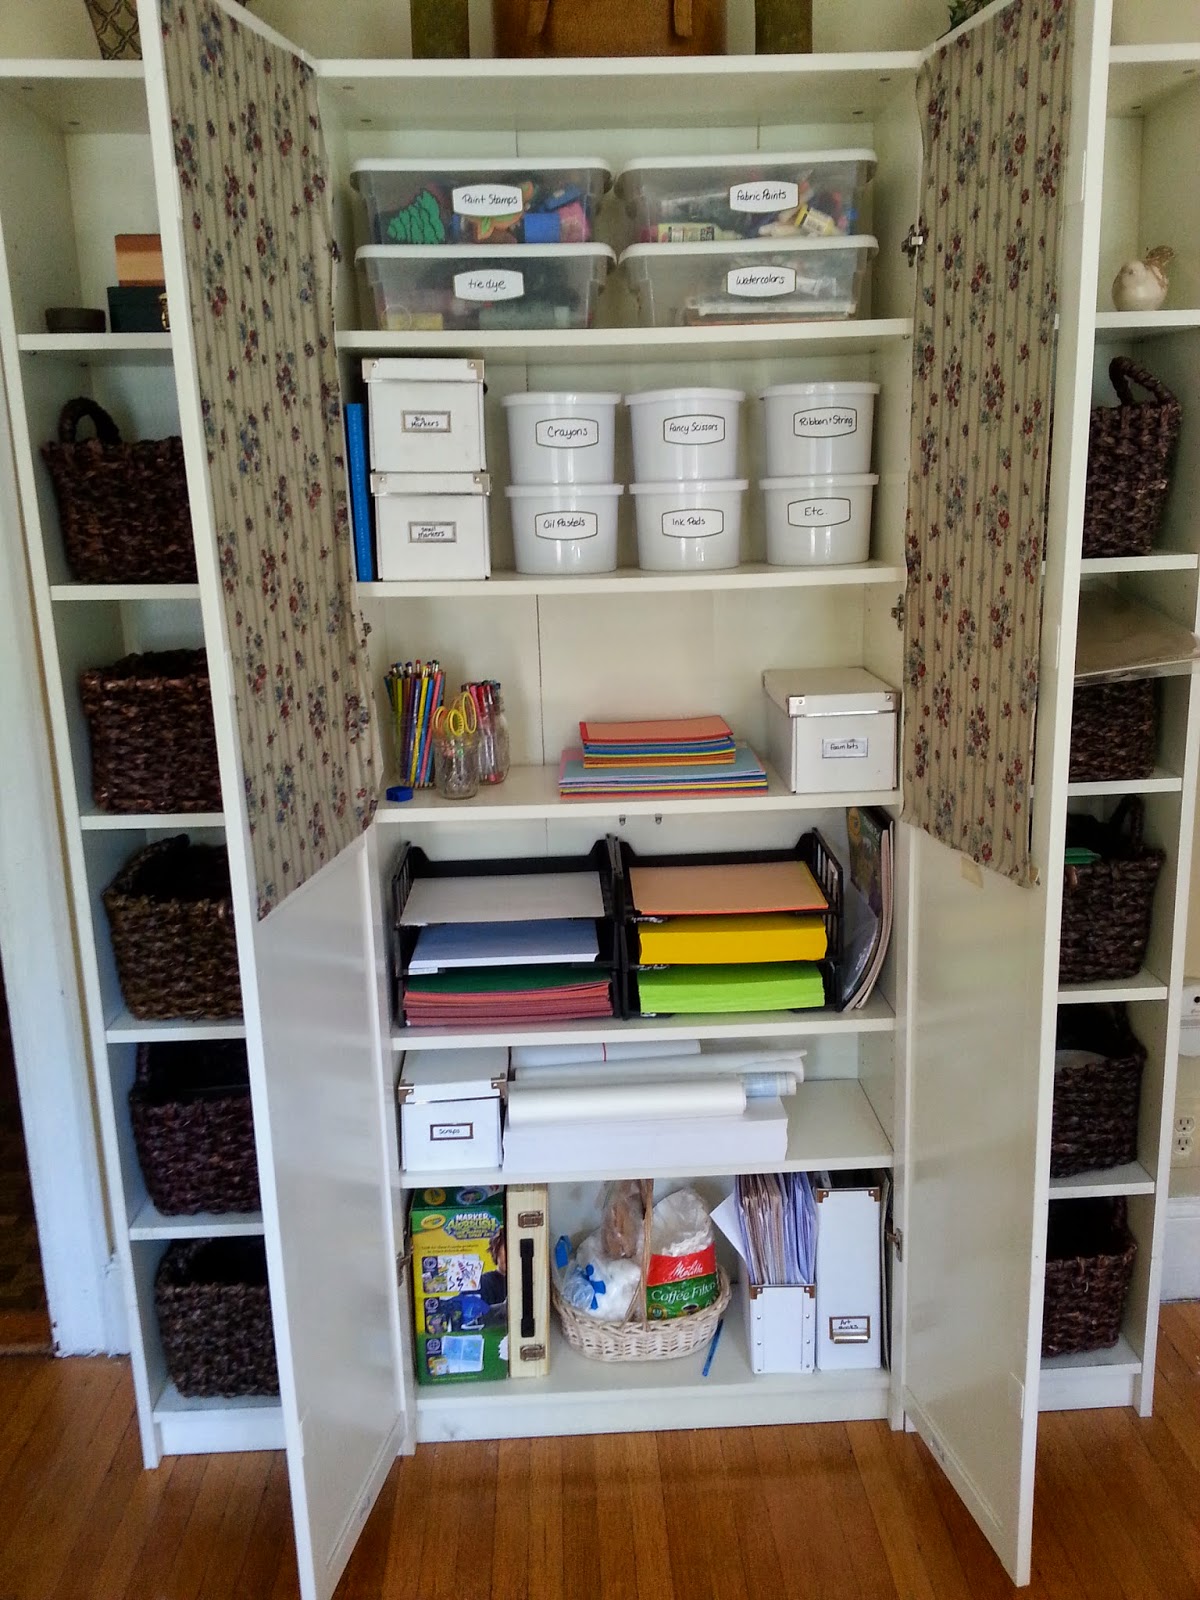 |
| Inside the cabinet... more art supplies. |
 |
| Noodle, drawing at the table. (The other kids ran away when they saw me coming with my camera.) |
And have I mentioned how much we love this room?
Next up... I'll be sharing our third and final "new" room... our living room! (Which, as of this writing, is still a work in progress... )
Wednesday, September 10, 2014
New Home Office!
When putting this room together, I had to work within a pretty tight budget. For the most part, I was able to make use of furniture and accessories I already owned. The only items I had to buy were some file storage pieces (one from HomeGoods for about $20, and one from this local shop, for about $25. Although they were not "needed" as such, I also picked up a little ceramic owl on clearance at Michaels, just because it was cute, and a little fern, to add a little green to the room.
But enough rambling on... I know what you really want to see is pictures!
(drumroll... )
 |
| from just inside the doorway, looking toward the back of the room. Desks for two, and a vintage bookcase for storage. The blue bins previously lived in my bedroom closet, but they weren't really working well in there anymore, but they are perfect in here, for storing power cords and cables and other computer accessories. Jars, baskets and boxes below hold art supplies. The curtained closet in the back holds our modem, printer, paper, etc. |
 |
| Large IKEA shelf unit, for more storage. The storage bins were old, unfinished wood bins I've had for years. After a couple of coats of gray paint and some stick-on chalkboard labels, they look like brand new. The file boxes on the bottom shelves will eventually be replaced with something prettier. |
 |
| The view from my desk. The bench used to be in our old daycare playroom, but now is a nice place for the kids to sit and talk to me while I'm working. |
 |
| The artwork over the bench has one of my current favorite poems. |
 |
| Nice, efficient work spaces! The chairs were formerly white dining chairs, which we painted blue and pumpkin. The blue art box on the floor was once my grandfather's. The rug is from IKEA, and used to be in the old daycare playroom. |
 |
| The baskets on this hanging file holder are labeled "This month" "This week" and "Today." This helps me get papers, bills, forms and other things I need to tend to done on time. (paperwork is my nemesis, so I need all the help I can get!) |
 |
| This cute little file holder/shelf thing is made from an old desk drawer. I love new stuff made from old stuff! |
 |
| One final, fun detail... this light switch plate was in the stairway of my grandparents house since my dad was a kid. I love having it in here! |
Next post: The Big Kid Playroom Reveal!
Thursday, September 4, 2014
Our First Day of (Not) School!
Yesterday was a very special day for us... It was Not Back to School Day! As I mentioned last post, this year was the first time in five years that I have not had to work on the First Day of (Not) School. It was WONDERFUL. We had a very full, exciting day!
We started with a Not Back to School Breakfast... Pancakes! After breakfast we cleaned up and did chores and got down to a little bit of school business. We keep things simple the first day... the kids decorate their binders for the year, and I have each child make a list of goals for the year. This is a fun little exercise... we always look back at the list at the end of the year, and see which things they accomplished and which things they still need to work on.
Since it was 83 degrees and sunny today, we decided to pack up a picnic lunch and spend a few hours at the beach! We met up with another homeschooling family there, and enjoyed having the whole beach pretty much to ourselves! We even wrapped it all up with some celebratory ocean-side ice cream.
Later in the afternoon, The Man and the boys headed out to the library, while I took Ladybug to her first ever class at a local community college. She is doing their Duel Enrollment program, which is a way for high school kids to earn college credit while doing high school. She was a little nervous at first, but she did well!
We wrapped up the day with a nice dinner, feeling happy and excited for a new academic year of living and learning together. We have so much to look forward to! In the coming weeks Ladybug will be starting some homeschool high school group classes, The boys will be continuing studies here at home, along with some hands-on science classes at a wildlife sanctuary, book discussion group with fellow homeschoolers, and other field trips and adventures. I will be teaching an Art class for a group of homeschooled students, which I'm very excited about. Monkey will also be doing Chorus at our local middle school, and Ladybug and Monkey start up dance classes again at the end of the month.
I feel really lucky to be able to give my kids these opportunities and to be able to be an active participant in their education. Although we've always homeschooled, I feel like I missed so much while I was working full time for the several years, so I'm really excited to be able to give them more of my time and attention this year. Life is good, and we are BLESSED.
 |
| All ready for Not Back to School Breakfast! Each year, I also give each child a little "First Day" present... small things like special pencils, stickers, little chocolates, and such. |
Since it was 83 degrees and sunny today, we decided to pack up a picnic lunch and spend a few hours at the beach! We met up with another homeschooling family there, and enjoyed having the whole beach pretty much to ourselves! We even wrapped it all up with some celebratory ocean-side ice cream.
 |
| First Day of (Not) School at the Beach! |
 |
| First Day of (Not) School ice cream! |
I feel really lucky to be able to give my kids these opportunities and to be able to be an active participant in their education. Although we've always homeschooled, I feel like I missed so much while I was working full time for the several years, so I'm really excited to be able to give them more of my time and attention this year. Life is good, and we are BLESSED.
Tuesday, September 2, 2014
Preparing for Not Back to School!
Tomorrow is our first official day of the new Homeschool Year. Although technically as homeschoolers we are learning year 'round, we still follow somewhat of a "school year." Part of this is because I'm a bit of a traditionalist, and I love the rhythm of seasons and milestones, and in my world, the Wednesday after Labor Day was always First Day of School. So, for us, even as homeschoolers, this is our First Day of (Not) School. I'm also a big fan of celebrating things, and Back to (Not) School is a perfect time for celebrating, so we will be having a special breakfast, and doing a few special things.
But first... before all this... I had to get our Homeschool cabinet all ready to go for the new year! I made some changes from last year. Since I've been changing up the rooms in our home with the closing of our Daycare, I was able to move all of our art stuff to our new playroom, making a lot more space in our homeschool cabinet for just school-related stuff. Here's a quick look: (Please forgive the photo quality... took these in the evening, with lights all glare-y in the glass door fronts... boo)
But first... before all this... I had to get our Homeschool cabinet all ready to go for the new year! I made some changes from last year. Since I've been changing up the rooms in our home with the closing of our Daycare, I was able to move all of our art stuff to our new playroom, making a lot more space in our homeschool cabinet for just school-related stuff. Here's a quick look: (Please forgive the photo quality... took these in the evening, with lights all glare-y in the glass door fronts... boo)
 |
| Our Homeschool cabinet, which sits in the corner of our kitchen. |
 |
| In the left side cabinet, we have my teacher supplies on the top two shelves, then pens, pencils, rulers, etc. On the bottom, we have the three kids' bags with all their daily work and supplies. |
 |
| Our Nature Shelf, which sits underneath our math supplies and over the cabinet which holds various science kits, equipment and books, as well as some social studies and language books. |
 |
| Writing stuff: jars filled with writing prompts, writing books, dictionaries and thesaurus, and paper. |
 |
| This cabinet holds back-up supplies on the top shelf, an old antique bell, a US map and a globe, and baskets filled with scissors, tape, glue sticks, hole punches, etc. In the closed storage, we have the laptop and laptop accessories, and Noodle's collection of car magazines |
I'm feeling fairly well-organized and ready to begin a fresh new year! This is a VERY exciting year for us, for several reasons. For one, it's the first year in 5 years that I've been able to really be 100% hands-on homeschooling with my kids, as it's the first year in 5 years I have not been working full time. It's also Ladybug's first year of high school, which brings all kinds of exciting opportunities and adventures.
But first, I have little back-to-school presents to wrap, and preparations to finish up for our exciting first day.
Subscribe to:
Posts (Atom)