Monday, March 31, 2014

Homemade Chili Seasoning

We are big fans of Tex-Mex-type meals here at The Homestead. We love things like bean chili, nachos, tacos and burritos. Since I'm all about the DIY, I make my own homemade chili seasoning for these dishes, which I keep in a little jar. This is similar to the stuff  they sell in little packets at the grocery store. The homemade version is less expensive, and you can adjust the amounts of the spices to suit your own tastes.

Homemade Chili Seasoning

Ingredients:

2 Tbsp chili powder
2 tsp paprika
1 Tbsp cumin
2 tsp crushed up dried oregano
1 Tbsp salt
2 tsp onion powder
3 tsp garlic powder

Mix together in a small jar, and store in a cool, dry place. Keeps for several months, though in our house we use it up much quicker than that!


Later this week, I will be sharing a Three-in-One recipe for Bean Chili with you, which uses this spice blend.

Thursday, March 27, 2014

Technology, Media and Simplicity

I have a long-standing love-hate relationship with technology. I know that technology is an essential part of life these days, but really, I'm not a "gadget" person. For me, technology is a tool, but not something I get super excited about. I'm perfectly happy with having the bare minimum that I need to work efficiently. I have a very basic laptop (three years old), and as of last year, I finally have a smartphone. I dug my heels in on the smartphone for ages, but it sort of became a necessity for me, as I'm often on the go and need access to email and documents while away from my laptop. I have learned that technology can fit into a lifestyle of Simplicity, and can actually enhance a Simple Life, but it can also undermine Simplicity when you become a slave to it. It's all about Balance, and letting it serve you, rather than the other way 'round.

Where my kids are concerned, I have always been exceptionally wary of media and technology exposure. Having studied early childhood education and child development before my kids were born, I was well aware that too much "screen time" was detrimental to their development. When they were really little, it was easy to keep them away from tech, as I, myself, had very little tech in the house. Just an ancient ol' desktop computer, a flip phone and a TV. During their early years, they watched maybe 2-3 hours per week of non-commercial, child-appropriate TV, or maybe the occasional family-friendly movie on DVD.  Because our TV was kept behind closed doors, the kids just didn't even think about it. It wasn't a regular part of our daily life. Because they watched so little, I didn't have to feel guilty on the rare occasions when I put Sesame Street on so I could make a few phone calls or wash the kitchen floor. I felt then, and still do now, that when used judicially and infrequently, TV can be a useful parenting tool.

But a lot has changed since my kids were very young.Tech is now more pervasive than ever, and as a parent, the task of monitoring exposure is more difficult, yet even more essential. The amount of tech in our home has increased dramatically in the last five years. We now have more computers, smartphones and even some e-readers. It would be all too easy to let tech take over.

Not too long ago I read an article written by a pediatric occupational therapist which detailed ten reasons that hand-held devices should be banned before age 12. While this might seem extreme to some, as a long-time advocate of reducing kids exposure to media, I happen to agree wholeheartedly with this idea. The article is well worth reading if you have kids. The author details many significant issues that come from too much exposure to technology, such as developmental delays, sleep deprivation, increased aggression and scariest of all, "Digital Dementia." This is scary stuff, people. The article also reinforces the importance of placing limits on tech, even beyond age 12. This is tough thing, for most parents. It's just EASIER to let them zone out in front of a screen or to keep them quiet with a hand-held game. Monitoring media consumption requires diligence on our part. But if we don't do it, no one else will. Here are some ways that we keep screen time within reasonable limits are our house.


1. No TV on "School Nights" Just as when they were little, I limit TV to 2-3 hours a week, only on weekends (except for special news events or other special occasions) This has always been a pretty easy one for us, as until recently, our TV was stored away in a cabinet, so if we wanted to watch it we had to take it out and plug it in. This past September we set up a TV room in the basement, so while the TV is now always accessible, it's not in the main part of the house, so it's still "out of sight, out of mind." In addition to monitoring how much they watch, we also keep an eye on what they watch. The rule is that what's on the TV must be appropriate to the youngest child in the room. http://www.commonsensemedia.org is very helpful for this part.

2. Set Laptop Rules. The kids use a laptop for their schoolwork, and they do like to use it for some fun things, too... like digital art, making music playlists and playing games. We have a rule that the laptop must always be used in a central location (so adults can check what's going on) and "recreational" computer time is limited to no more than 30 minutes per day for the big kids, less for the 9 year old.

3. Set phone rules. Once the older kids started venturing out to classes and activities without us there, we got them cell phones, for safety's sake. Ladybug, age 13, has a stripped-down iPhone (no internet access, only a few pre-approved apps) and Monkey, age 12, has a very basic Tracfone that can only call and text. There are strict phone rules, in our house. Phones must be left plugged in on the kitchen counter by 8pm every night, no exceptions. Phones can be retrieved the next morning AFTER chores and schoolwork have been completed (usually around lunchtime) We also do not allow phones at the table.  The kids are also well aware that parents reserve the right to check the phones as they see fit.

4. Don't worry about keeping up with the neighbors. Of COURSE your kids are going to tell you "But EVERYONE ELSE is allowed to watch (insert show) and EVERYONE is allowed to play (insert game) and EVERYONE has (insert device)" This is not a good reason for your kids to have it. We simply point out that these are the rules in our house. We explain the reasons for our decision, and that is that. This can get tricky in a blended family situation like ours. My step-kids do not have the same rules at their mom's house that we have here, and that can definitely make things a little hairy at times (This could be the topic of a whole other post!) But we just remind them that we set the limits we do because we love them and want to make sure we're parenting them the very best that we can.

One cool thing that comes out of monitoring media/tech consumption, is just how much time is left for other things. When kids aren't tied to a device, they are reading books, making art, playing outside, having face-to-face conversations, playing real, in person games and developing real relationships with the important people in their lives.

Monday, March 24, 2014

Root Veggie Chips

Current batch of Root Veggie Chips: Red beets,
golden beets and sweet potatoes.
One of my favorite healthy snacks is Homemade Root Veggie Chips. They are perfect for satisfying those cravings for something crispy and crunchy. They are really good with dips, or on their own. There are lots of ways to make these, but I prefer to keep it simple with just a little olive oil and salt. For this batch, I used red and golden beets, and some sweet potatoes. Carrots and parsnips are tasty, too. Here's how to make them:

Slice up your root veggies, nice and thin. The best way to do it is with a food processor or mandolin slicer. You can do it with a knife, but it's REALLY hard to get uniform slices that way, and it takes a long time. Next, toss your slices in a bit of olive oil. You don't want them swimming in it, but you do want to make sure the slices all have a light coating. One word of warning: If using beets, toss them separately than the other veggies, or everything will turn pink!

Next, place the slices in a single layer on dehydrator trays (if you're using a dehydrator) or on a baking rack on a cookie sheet (if you're using an oven) Sprinkle with salt. For a dehydrator, follow the instructions for your particular appliance. To do them in the oven, put them in at the lowest temperature possible and watch them very carefully, so they don't get overdone. they should be just crispy, but not browned.

I do mine in a dehydrator. My cousin gave me one several years ago. It was the kind of thing that I wouldn't have ever thought to buy for myself, but now that I have it, I use it A LOT. I'm actually considering getting a bigger one! In addition to making these veggie chips, I also use my dehydrator to make kale chips, "sun-dried" tomatoes, dried apples, and other dried veggies and fruits.

Veggie chips with Cashew Cheese... yum!
These chips will keep for quite a while if kept in an airtight container. I'm not sure exactly how long they keep, as they never last for more than a day or two before they are eaten right up!

Friday, March 21, 2014

Equinox!

Yesterday was the first day of Spring! Though it still looks pretty wintery out there in some areas, the temps are slowly starting to creep upward, the snow is finally melting and we have some little seedlings sprouting on the kitchen windowsill. I just love Spring!

Every year, we celebrate the First Day of Spring with a special Spring Feast! However, this year we were really busy from early morning until late evening with work and homeschool stuff on the day of  the actual Equinox, so we've had to postpone our celebration until tonight. I'm currently making a Spring Salad of baby greens and a light, spring-y pasta dish with asparagus, peas, carrots, white wine, lemon and herbs.

On a more personal note... I am also celebrating spring with a fresh new haircut (long overdue... it's been 6 months!) and... for the first time in over three years, some hair color! I kept telling myself I didn't have time to do this (I am still struggling to catch up after the the Great Norovirus Debacle) but the fact is, I will never really have time, as there will ALWAYS be something more important to do. So I finally decided to just DO IT, and I'm so glad I did. My hair was looking so ratty, and now it feels much lighter and healthier... and... no more grays! I've been starting to get quite a few grays the last year or two, and I have waffled as to whether to embrace them or fight them. I guess I'm not quite ready to embrace them just yet!

Another thing about Spring... this means it's time to get the yard cleaned up, now that Winter's Wrath is (hopefully!) over. Things are a mess, out there, and I'm really looking forward to being able to enjoy our yard, once again!

Happy Spring, Everyone!

Tuesday, March 18, 2014

Irish Soda Bread, Two Ways

I have talked at length on this blog about how I'm trying to eat a whole-food, vegan diet, and avoid flour and sugar. But every now and then (particularly on holidays) one needs to splurge on a little carb-loaded comfort food. As you might have noticed, yesterday was a holiday, of sorts... St. Patrick's Day!

Now, I'm not Irish, but back in the late 90's I happened to marry into an Irish family. My former husband's grandmother bestowed upon me a recipe for Irish Soda bread. Perhaps she gave it to me as a way to welcome me into the family, or maybe she was just trying to make sure her grandson would still get soda bread, even though he chose to dirty up the Irish bloodline by marrying a non-Irish mongrel. Either way, I was happy to have it.

Although the marriage didn't last, it did produce three beautiful half-Irish children. To this day, I still bake soda bread for them every St. Patrick's Day. In the beginning, I made it the traditional way, with white flour and buttermilk. As the years went on, and I started trying to eat healthier, I altered the recipe a bit, by using whole wheat flour instead of white. Soda bread is actually made with whole wheat flour in Ireland as well... but then it's called "brown bread" instead of soda bread. As I've given up dairy, I've further changed things up, so that now I can make it vegan, too. Today I'm going to share both recipes with you. First, the original way, then, my slightly healthier way. Without further ado...

Nana Cheever's Irish Soda Bread

2 1/2 cups flour
1 tsp salt
1 tsp baking soda
1 cup buttermilk

(caraway seeds and raisins are optional... Nana often used caraway seeds. Though I hear that most Irish people say that those additions are not authentically Irish.)

Preheat oven to 350. Combine all the dry ingredients together in a large bowl. Add the milk, and mix just until it's all blended together well. Dust a board with flour and shape the dough into a round loaf, adding more flour as needed, but being careful not to knead the dough too much, as excessive handling will make the loaf tough. Place the loaf on a greased pan. If you want to, you can score the top with an "x" with a sharp knife. Pop it in the other for 30-40 minutes, until it's nice and brown.

Mama's Healthier Vegan Soda Bread (or, "brown bread")

2 1/2 cups whole wheat flour
1 tsp salt
1 tsp baking soda
1 1/4 cups unsweetened alternative milk (I used unsweetened hemp milk, this time)
1 Tbsp white vinegar

Preheat oven to 350. Add the vinegar to the milk and set aside. Combine the dry ingredients in a large bowl. Pour in the milk mixture, and mix until just blended together. Since whole wheat flour absorbs more moisture than white, you may need to add a smidge more milk, just a tiny bit at a time so you don't add too much. Dust a board with flour and proceed as above.
Our loaf from yesterday, fresh from the oven...
crusty on the outside, warm and tender on the inside. 


Monday, March 17, 2014

Frozen Smoothie Packs

I love smoothies. They are a great way for me to get more greens into my kids' diet, and they are great on-the-go breakfast or snack for busy days. The downside to smoothies is that it does take time to chop everything up, so there are times when I'd love to have one, but don't bother because it takes too much effort.

But... I have a new trick up my sleeve, to make smoothies easy enough for everyday. Pinterest and food blogs everywhere are all abuzz about Frozen Smoothie Packets. Have you heard about this!? I wish I could track down the person who came up with this idea, because I would give them SUCH a hug.
Smoothie Packets

Making smoothie packets is EASY. Just cut up the fruit and greens for your smoothie, and put a
single serving amount (or double serving, if you want to make smoothies for two) into a zip bag and freeze. When it's time to make a smoothie, just take a bag out of the freezer, dump it in your blender, add water and blend. Boom! Smoothie in two minutes, no effort, no mess.

I made up two different types of smoothie packs this week: Banana- Mango and True Blue. Here are the recipes (each makes one serving)

Banana Mango Smoothie:

1 frozen banana
3/4 cup frozen mango chunks (I sometimes buy the bags of frozen mango from Trader Joes, to make things easier)
1cup of kale, packed
1 Tbsp hemp seeds (or chia)
1 cup water

True Blue Smoothie:

1 frozen banana
1/2 green apple
1/2 cup blueberries
1 cup kale, packed
1 Tbsp hemp seeds
1 cup water

Any blender will do in a pinch for smoothies, but I have to say that I just LOVE my Nutribullet blender, which The Man gave me for Christmas this past year. It is small and easy to clean and powerful enough to blend up a smoothie in no time flat. I highly recommend.
This morning's Banana-Mango Smoothie
Tomorrow, I will have a special post-St. Patrick's day post, with not one but TWO recipes for Irish Soda Bread.

Friday, March 14, 2014

Eeek! Norovirus!

So, I had a post planned out, about kids and technology... but then my week took a U-turn and crazy things happened so something else entirely seems really important to write about, instead.

Norovirus!!

Let me tell you... Norovirus is not to be taken lightly. It is very serious and potentially life-threatening. It's extremely contagious, fast moving and violent. And on Wednesday, it attacked my middle boy. It attacked him fast and hard and he just returned from a two-night stay at Children's Hospital, Boston. Here's what happened.

Wednesday evening, Monkey mentioned that he wasn't too hungry, and didn't feel like finishing dinner. At the time, I thought this might be code for "I don't really like tonight's dinner," or that maybe he was tired from staying up late for a parcour class the night before. So I told him to go have shower and get ready for an early bedtime. By 8pm he was looking decidedly green, and said he REALLY didn't feel good. Vomiting soon commenced, along with severe stomach pains. He spent the next 90 minutes on the bathroom floor, alternating vomiting with curling up in pain from cramps. He couldn't get more than 15 minutes break between bouts. I'd never seen any of my kids so sick, and I was concerned. I called his pediatrician. By 10pm we were at the ER. They soon started him on an IV, as he was already showing some signs of dehydration. By 11pm they were giving him anti-nausea meds in the IV, too, as he threw up the meds they gave him orally. By Midnight, when the diarrhea started, they decided to admit him, as he was losing fluids faster than they could replace them. By around 4:00 am, they found a good combination of meds and things quieted down a bit. By 4:30 am, he was asleep, as best he could with constant checks of his vitals, as happens in hospitals. By this point, I had been awake for a full 24 hours, as I had gotten up at 4:30 for fitness bootcamp the previous morning, but I was wired from a combination of adrenaline
The view from our window at
Children's Hospital, Boston.
and concern. By 5am I had settled into the parent's sleep-chair, updated concerned family members, and then spent the next two hours drifting in and out of sleep until Monkey woke again at 7. He slowly got a bit better throughout the day, though suffered a relapse in the evening, after attempting some solid food. They put him back on the IV, things settled down, and he was able to get some good rest, finally, from about 9pm until 5ish. He was better by morning, and actually felt a bit hungry, though still very weak from his ordeal. Once he proved that he could get out of bed on his own accord, drink fluids and keep down some light food, the doctors agreed that he could leave the hospital. We got home around 3 o'clock this afternoon, and he was VERY happy to have a nice, warm shower, and crawl into his very own bed. He's still tired, but I think with a good night's sleep here at home, he'll be back to his old self tomorrow. Fingers crossed!

So here's the thing... Monkey is a very healthy, robust 12-year-old boy, with a strong immune system. Having seen just how sick this illness made him, in such a short span of time, I can only imagine how horrible it would be for a toddler or frail, elderly person. Norovirus is no joke. Seriously , it happened SO FAST. And, I very nearly did NOT take him into the ER that night, thinking that maybe I was overreacting, and that it was just a minor tummy bug which would soon run it's course. I am SO glad I listened to my gut and took him in... because who knows what would have happened if I didn't.

At this point, I've had a total of about 6 hours of sleep the last 3 days. I'm totally spent. It's time for me to get myself ready for bed. So happy to finally be at home with The Man and three healthy kids. Counting my Blessings tonight, for sure.

Info about avoiding Norovirus here:

http://www.cdc.gov/Features/Norovirus/

Wednesday, March 12, 2014

Energy Snacks

A few months ago, a fellow homeschool mom gave me a great recipe for coconut date nut ball snacks. They are made from cashews, almonds, dates, coconut and coconut oil. You toss all the ingredients into a food processor and then form it into balls or bars. Raw, healthy, delicious energy on the go. Can't beat it! I've made them several times for my family, and they are always a big hit. But... just last week, my friend Katherine shared a blog post for three other kinds of "Energy Balls." (Deeelish, by the way, especially the brownie ones!) These variations got me to thinking... the basic "formula" for these kinds of snacks are the same, but by mixing up the type of nuts and "add ins" you can make new flavors. Naturally this has led to a bit of kitchen experimentation, and so far, they've all been yummy.

So... here is the formula:

Ingredients:

Variable:
1 cup of nuts (either one type, or a mixture)
1/2 to 3/4 cup "add in" (other dried fruit, carob chips, chocolate chips, coconut flakes... whatever!)

Constant:
15 Medjool dates or roughly 1/2 cup of smaller dates,  (this is the sweetener)
2 tsp. Coconut oil (optional, if you skip it, use more water)
1-2 tsp water, as needed


Here's what to do: Place the nuts and dates into the food processor, and process until chopped up well. Add the coconut oil and 1 tsp of the water, and your "add in". Process until it starts to clump together, adding more water as needed. Shape into small balls and refrigerate. Makes about 8 servings. (I usually make 16 small balls)

Here are some of the combos we've tried so far:

Walnuts, dried apples, touch of cinnamon
Mix of almonds and cashews, raisins
Mixed nuts and coconut flakes

I give these to the kids before their dance classes, and I eat them before my workouts. They are also great to take along on hikes. I love that they go together in 10 minutes and require no cooking. I look forward to trying some more combinations soon!


Monday, March 10, 2014

Getting Fit?

I recently posted about my renewed dedication to getting back into shape. I've been very slowly working up to incorporating more exercise into my life. A few weeks ago, It was The Man's suggestion that I chronicle this journey here on the blog, so that maybe I might inspire others toward healthy changes, and keep myself accountable. I balked at this, at first, as it seemed too raw, too personal, too scary. I was afraid to really put myself out there like that, to show myself warts and all... and what if I fail? What if I get lazy (again) and fall off the exercise wagon? Well, I decided that if I do, that's OK. I'm human, and sometimes humans fail. And if I do fall off the wagon, I'll just get back on.

Ultimately, I feel like getting back into shape is a totally attainable goal for me, if I just stick with it. Just five years ago, I was healthy and fit, doing yoga several times a week and weighing in at about 115 lbs. Since then, my commitment to exercise has been spotty at best, and my weight has gone up and down, but as of now I am at my highest weight ever, and a good amount of the fat I've gained is right at my waist (or rather... where my waist used to be!) I have a family history of both heart disease and diabetes. We all know that belly fat contributes to heart disease, and excess weight can be a factor in Type 2 diabetes. I know that I am putting myself at risk for lasting health issues if I don't act now and make some changes. I don't really have a particular "goal weight" in mind. The numbers on the scale mean less to me that how I feel overall. However, I definitely would like to see a few inches come off my waist.
6am...  post-boot camp.
Tired, sweaty, but still
(barely) smiling.

This morning, I just completed my first "Fitness Boot Camp" class! It was really hard, but I feel good, and I'm looking forward to going back. It feels great to know that I am working my way back to a place where I will feel healthy, strong and fit.


Friday, March 7, 2014

Peanut Noodle Stir Fry

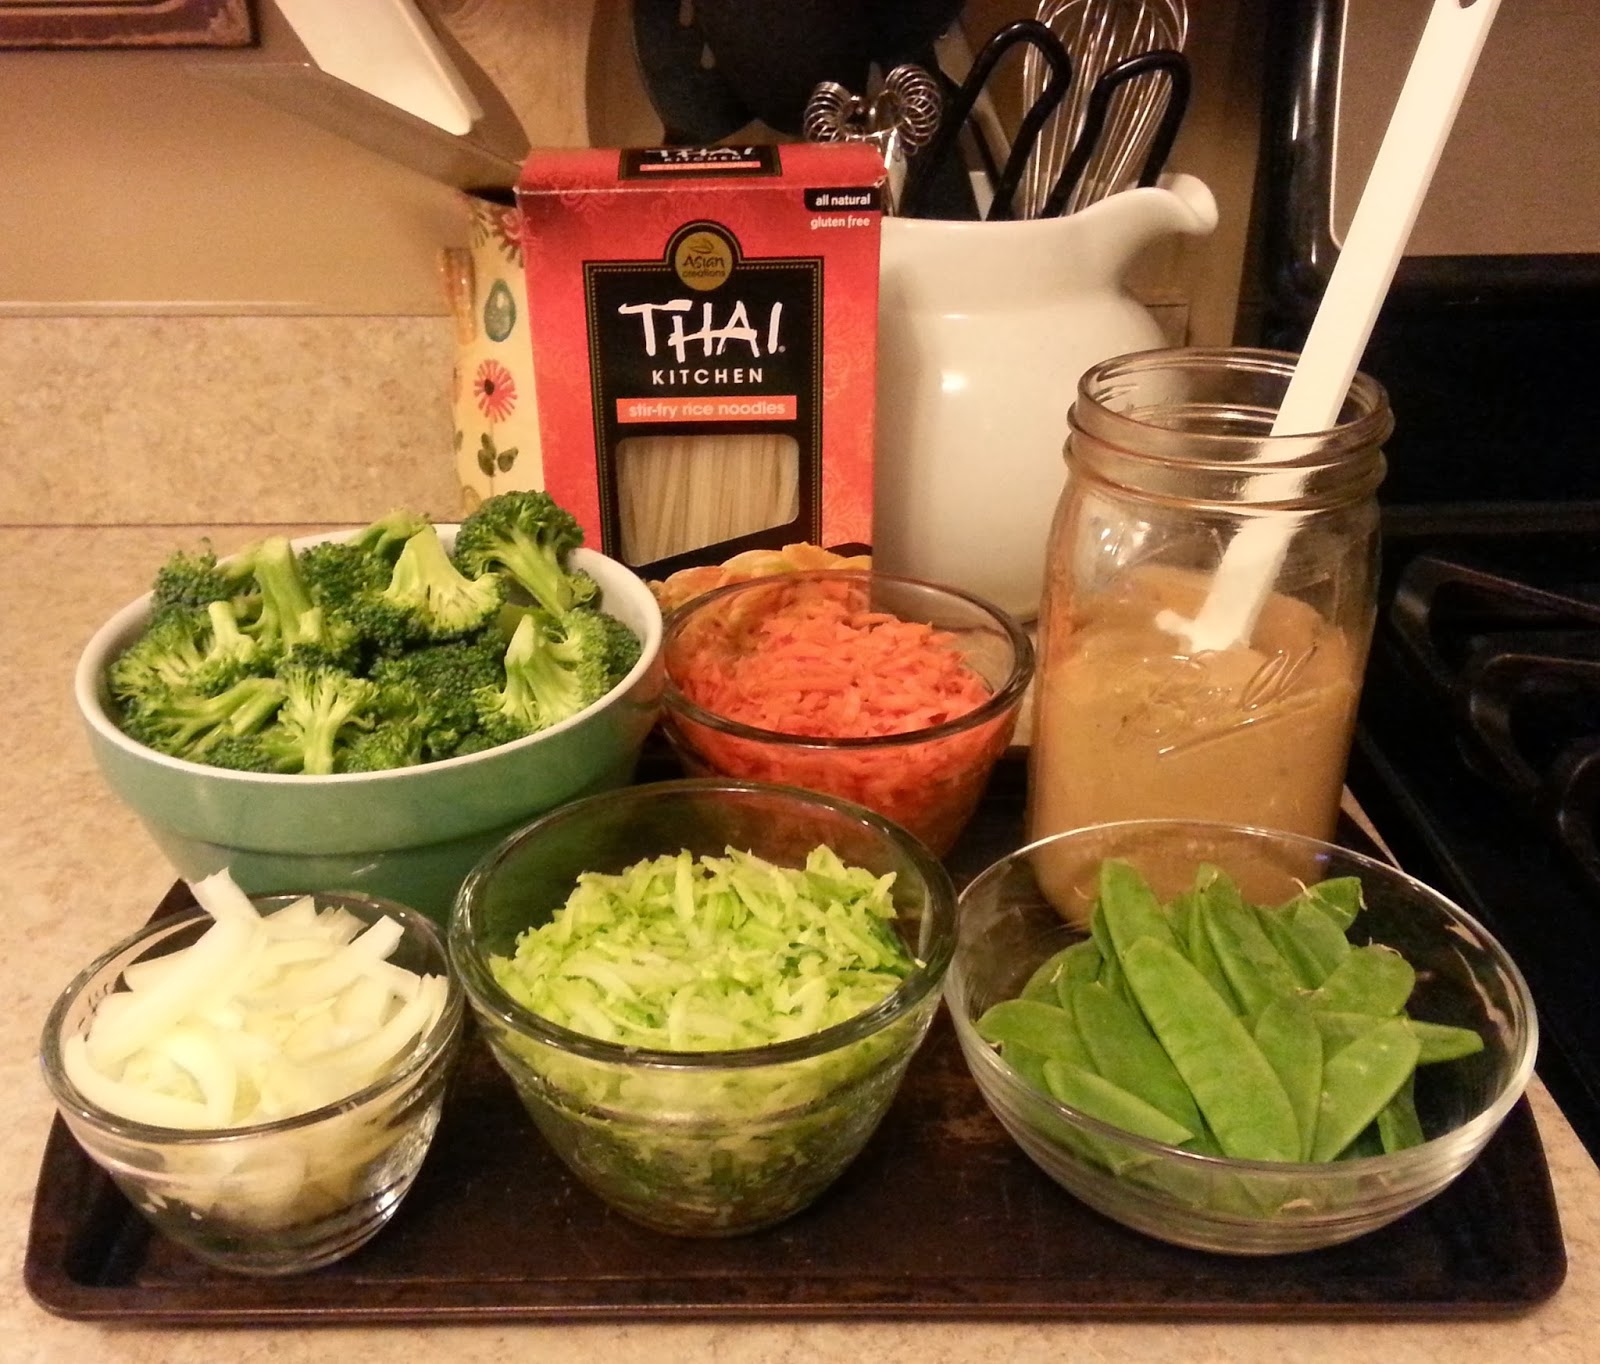
The ingredients... ready to go.
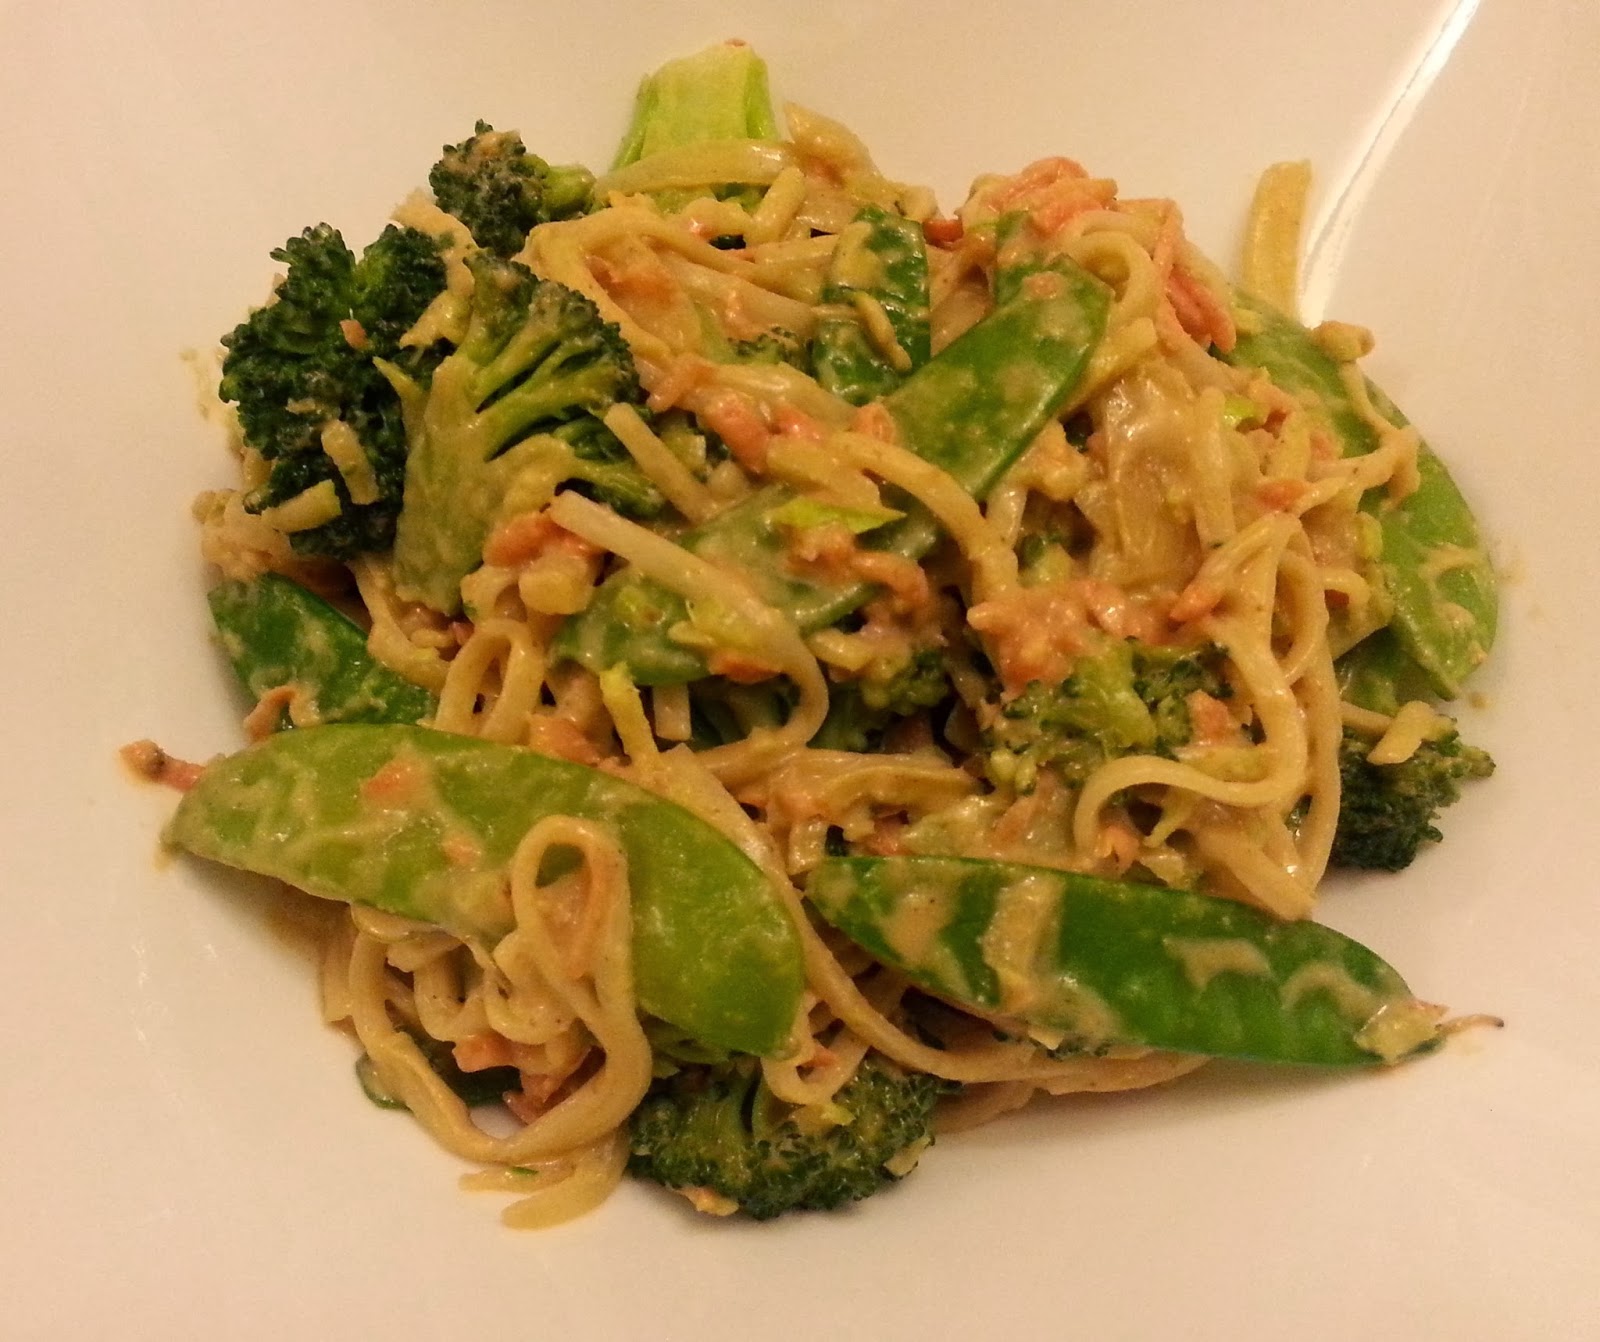
 Most nights at dinner, there is at least one kid who is rolling his or her eyes and making a face at what is being served. This, as you might imagine, drives me crazy! There are very few meals that everyone in my house of picky eaters actually likes. In fact, I can probably count them one hand. But one of those meals happens to be one of my favorites as well, so we have it nearly every other week. And would you believe this meal is vegan, gluten free, healthy AND delicious? I'm talking about Peanut Noodle Stir Fry.

Another great thing about this meal is that I can prep up the ingredients ahead of time, and stick them in the fridge. Then when dinner time rolls around, I can have this on the table in 15 minutes flat. This recipe is versatile, too... you can substitute whatever veggies you have on hand, and if you happen to have a little extra peanut sauce leftover, it makes a yummy dip for raw veggies.

Peanut Noodle Stir Fry

Ingredients:

One package of rice noodles
1 Tbsp peanut oil
1 small onion, sliced
Large head of broccoli, cut into florets, then shred the stems in a food processor (keep stems separate)
2 cups of carrots, shredded
1 cup of snow peas
(other suggested veggies to add or substitute: thinly sliced peppers, peas, baby corn, green beans)

Peanut Sauce:

1 cup of peanut butter
1 cup of warm water
2-3 Tbsp of soy sauce (to taste)
1/2 tsp ground ginger
1/4 tsp red pepper flakes

Prepare the peanut sauce first, buy whisking all the ingredients together until smooth. If it's too thick, add more warm water. Set aside. (You can prepare the sauce ahead of time and store it in a sealed jar in the fridge for up to two days)

Boil a large pot of water. Meanwhile, heat the peanut oil in a large skillet or wok. Add the onion, and cook for a few minutes, until it starts to soften a bit. While the onion cooks, add the rice noodles to the boiling water, turn off the heat and cover. (The noodles take about 10 minutes to soften, which is about how long it takes to cook the rest. Stir them once or twice to keep them from sticking together.) Back to your wok, add the broccoli and the snow peas. Stir and cook until crisp-tender. Stir in the broccoli stems and shredded carrots. Stir and cook another minute, just to heat through. Drain the noodles, then toss them with the veggies and sauce until everything is well-coated. Serve in big bowls. If you want to be very fancy, you can top this with some chopped scallions and some crushed up peanuts.
YUM.


Wednesday, March 5, 2014

My Home/Family/Work Binder

As I've mentioned before, I often have quite a few balls in the air, managing my home and family, running a daycare and homeschooling three kids. In order to keep my act together, I make lots of "to do" lists. Seriously... I am The Queen of To Do lists. My family likes to say that if it's not on one of Mom's lists, it doesn't get done. Sad but true.

My "master" To Do lists are in a big binder (more on that below) I started my first binder back when my kids were wee babies. I was a stay-at-home mom at the time, and had been introduced to Flylady by a friend. I liked her simple routines for keeping my home in order without much effort. I didn't follow her system to a T, but one of the practices I did adopt was what she calls the Control Journal. In short, this is a binder where you keep daily lists and other notes to keep your home and family running smoothly.

As I transitioned from the blissful life of a stay-at-home mom to the chaotic life of a work-at-home mom, I definitely floundered. Like, A LOT. In trying to adapt to my added responsibilities, I lost sight of my basic routines. BIG mistake. Not having routines in place made me feel like I was driving around a strange country without a map. I felt like I was constantly struggling, constantly behind, constantly failing. I realized that I needed more order, better time management, a better "system" in place for running my life. I needed a map! I remembered my old Control Journal. I decided it was time to create a new binder to suit my now busier life. So I did, and it made a big difference for me. Did it instantly fix all my problems? Well, no... it's been a slow process of learning to prioritize, take care of myself, and make my routines work for what life was handing me. I'm still learning. But my binder is a really important tool in my journey... it keeps me focused, keeps me grounded and keeps me organized.

I have revamped the binder a few times, to suit my needs (and will be revamping it again when I enter the next phase in my life this fall) but here is it's current incarnation:

I started with a basic binder, and got some dividers and pocket dividers for it. My binder has 5 sections:

1. Daily Routines (my morning and evening routines, and master "To Do" lists for each day of the week.

2. Bills, etc (a pocket for bills that need to be paid, as well as a list of each month's bills and when they're due. 

3. Home Projects (an ongoing list of home projects/repairs that need doing)

4. Menus and Shopping (a pocket to keep my shopping list pad and meal planning pad, a pocket for coupons and meal planning ideas)

5. Cleaning lists (this is a list of routine cleaning that needs to be done. I use something like the "zone" system from Flylady, adapted to suit my own needs)

Plus, a large pocket in back for stamps and return address labels. 

Here is a little glimpse into how some of it is set up:

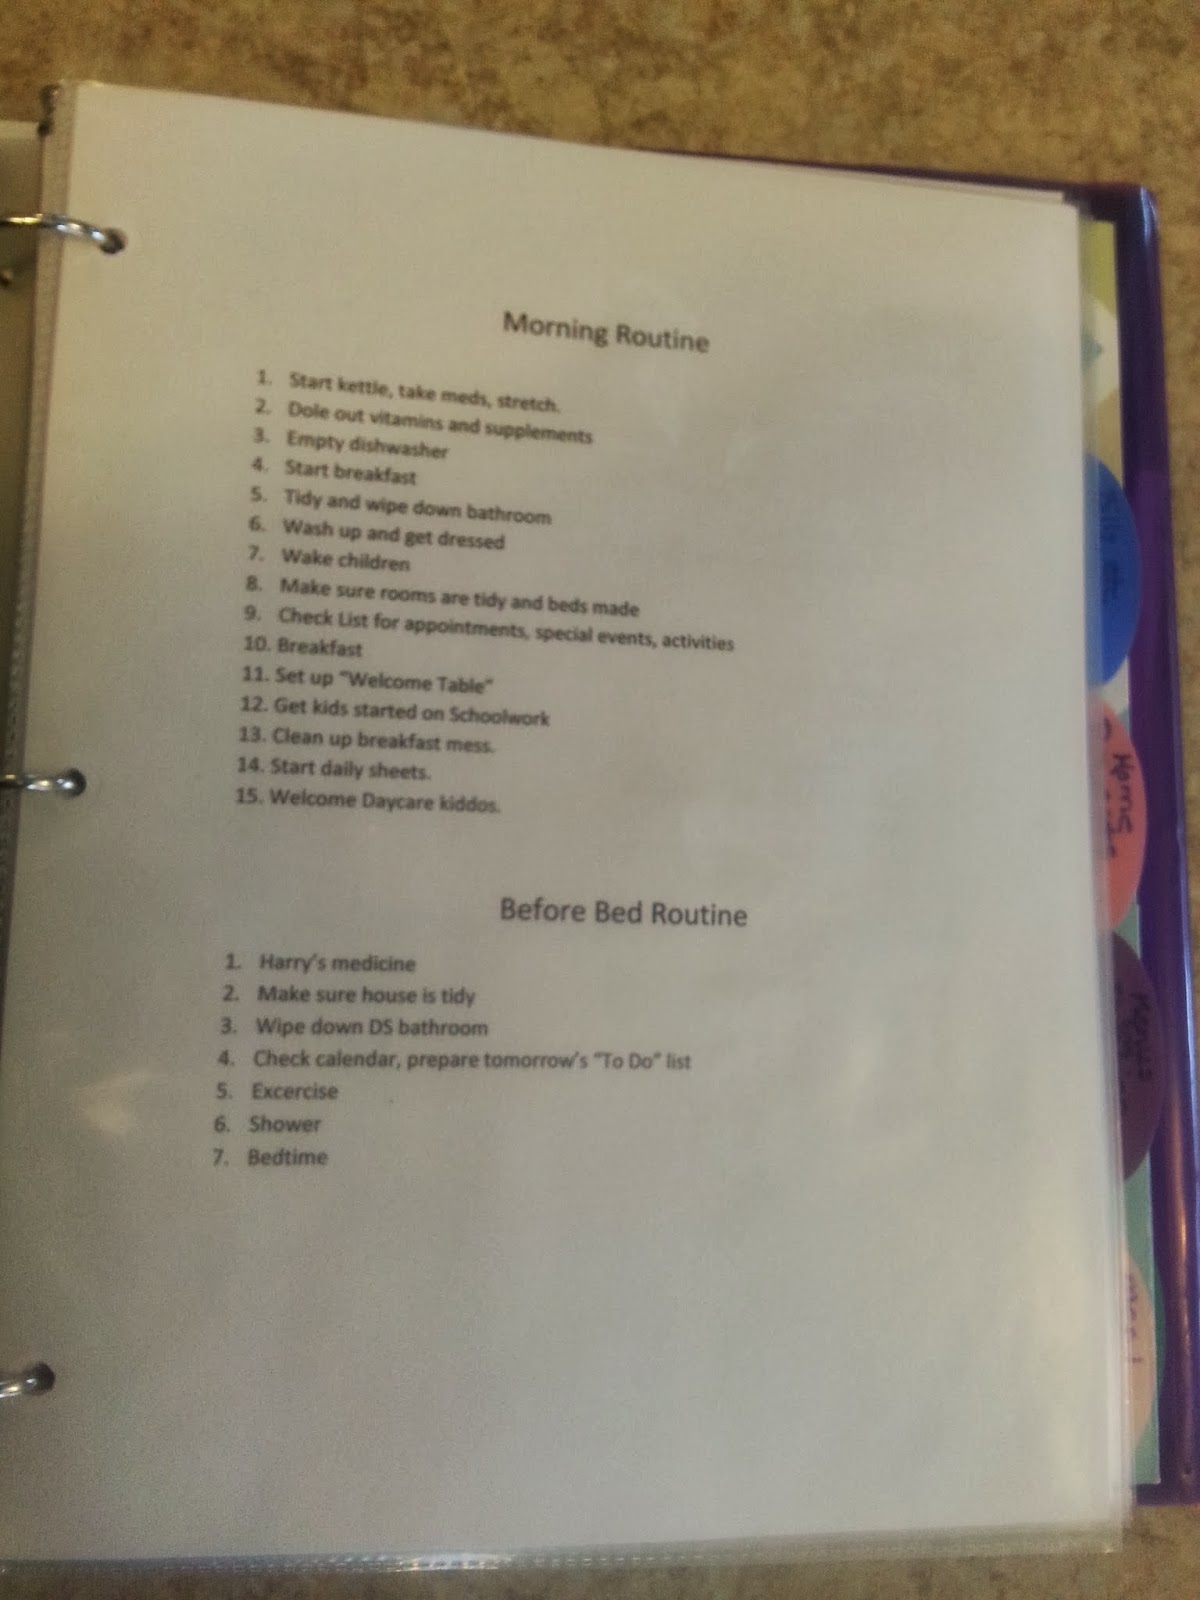
The first page: Morning and Evening Routines. This is a direct swipe from Flylady! These lists are the little tasks I need to get done first thing every morning and last thing every night. It might seem silly to have to write some of this stuff down (I don't really need to be reminded to feed the family breakfast, for example... they'd never let me forget!) but in establishing good routines and habits, it's helpful to have everything there in front of you. Plus, there is a certain satisfaction in looking at your list and knowing that you accomplished things, no matter how small.

Still in the "Daily Routines" section, I have a page of "To Do" lists for each day of the week. This is important, as the tasks I do each day depend on the day of the week. In additon to the "master" list of stuff I do every Monday or Tuesday or Wednesday (etc) I also use post-it notes for any other tasks that need to be taken care of that day. I keep all the "Master Lists" in clear sheet protectors, so I can use a dry erase marker to cross things off as I do them. (This is another idea lifted directly from Flylady!)
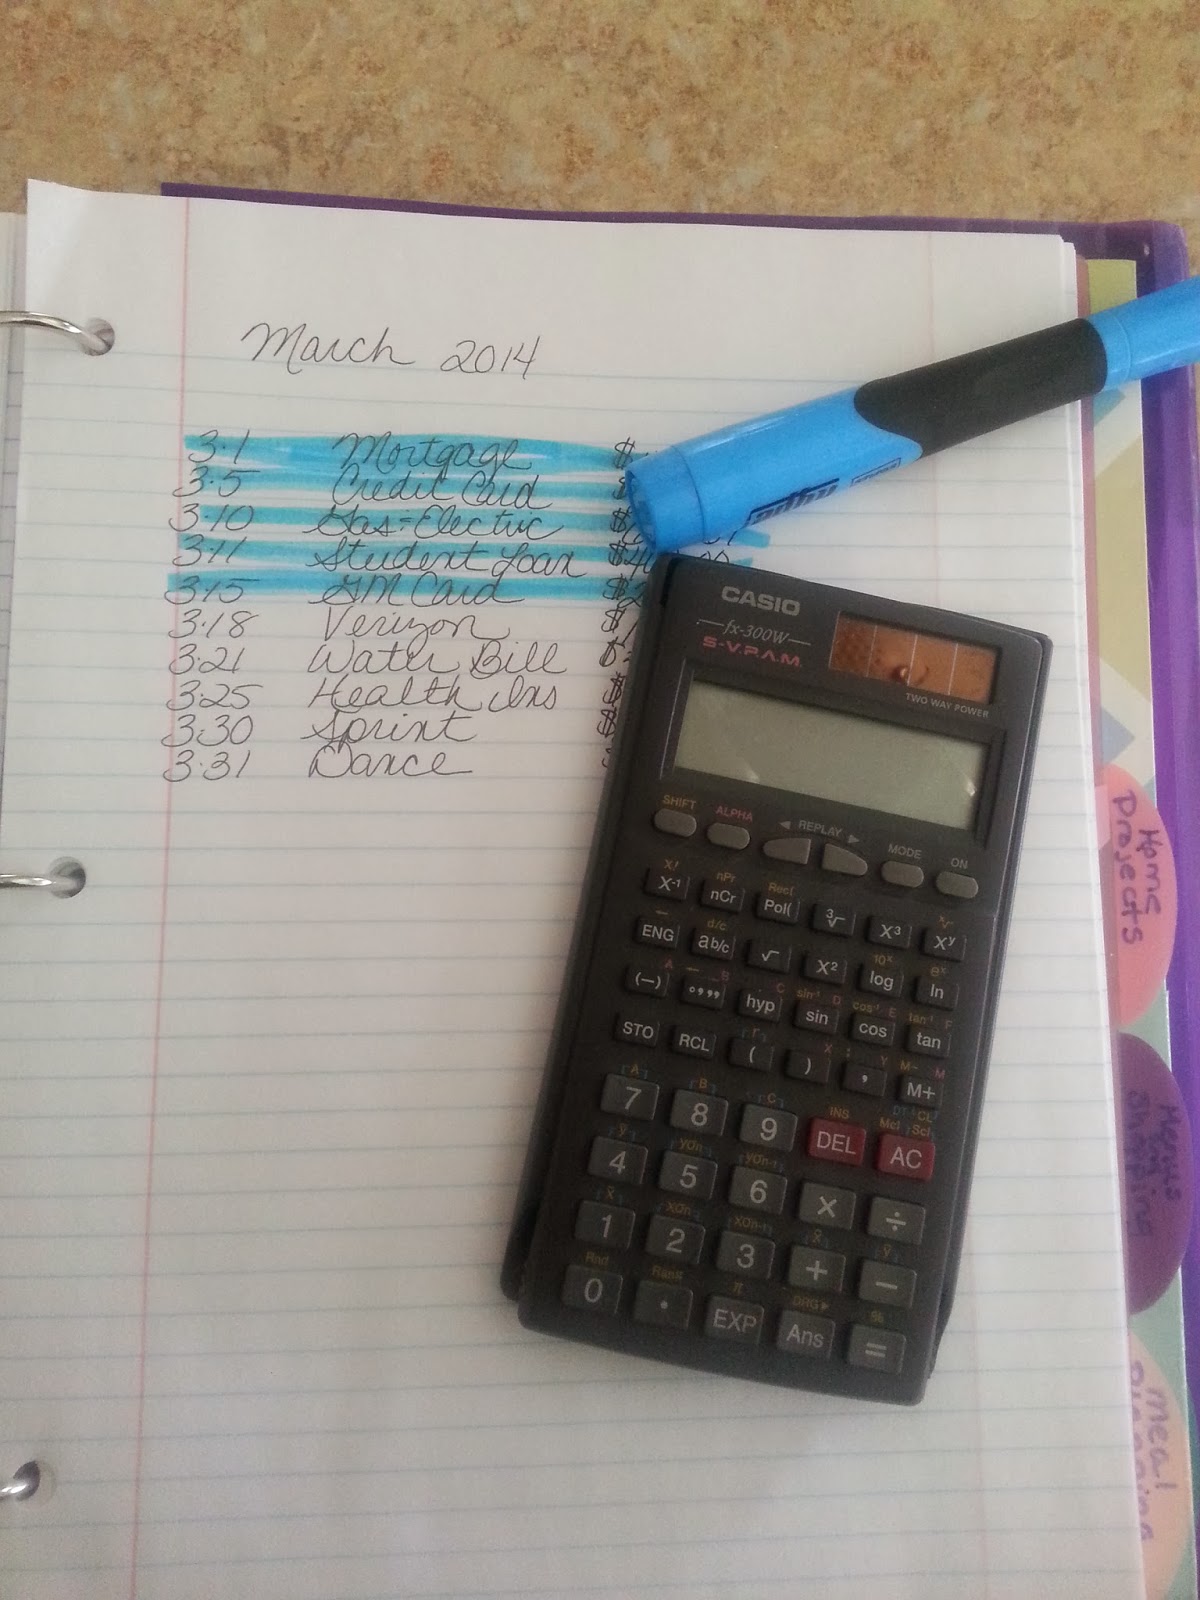
Next section is the Bill section. This is how I keep track of bills that need to be paid and when they are due. As bills come in the mail, I tuck them into a pocket in this section. Around the middle to end of each month, I make a list of the bills that are due for the next month, with due dates and amounts due. This is especially helpful for keeping track of all the paperless bills we have now. As I pay each bill, I cross it off with a highlighter. I keep these sheets in the binder, and it helps me to plan our budget, having all that info at my fingertips. 


My other essential item, my calendar, deserves a quick mention in the post, too, I think. I would seriously be non-functional in my day-to-day life without these two items. I find that I really need visual guidance to stay on track, and these tools do that for me.

Monday, March 3, 2014

My Favorite Citrus Cleaner

Just a quick post, today, as it's crazy around here this week! We have had lots of homeschool stuff going on, and I've been trying to wrap up my "month end" accounting for the daycare, AND I'm working on preparing all the "stuff" to have the business taxes done. This is the part of being self-employed that I hate more than anything... all the administrative/paperwork stuff! Seriously, it is not my forte, and I always feel stressed out and incompetent while muddling through it all.

Orange, clementine and lemon peels in vinegar,
waiting to become Homemade Citrus Spray Cleaner
But... in the midst of all this, I did take some time yesterday to start a new batch of my homemade citrus cleaner! I first wrote about this cleaner last April, but I figured I'd post a picture of my current batch-in-progress, along with a link, for those who may have missed it before. This is a good time of year to make this stuff, as citrus is in season, cheap and plentiful in the winter. And... how great to be able to make something useful out of something you would normally throw away?


I really do love this cleaner. It's especially great for cleaning the greasy, dirty stove top (something that needs to be done constantly here, as I do cook A LOT) But although it works really well, it's totally non-toxic, made entirely of things you could eat if you wanted to. Green, frugal and effective... my favorite combination.