Sunday, September 30, 2012

Autumn Craft... Beeswax leaves

Noodle and I did a cool craft this weekend... we preserved pretty Autumn leaves in beeswax! I got the idea from something I'd seen on MarthaStewart.com a while back. It was a fun (though slightly messy!) project for my littlest boy. Here's what we did:

First, we grated some beeswax into a Pyrex cup and microwaved it to melt it. Then, we dipped the leaves in one by one...

We did have to re-melt the wax a few times while we were working, to keep it liquid.


After we dipped each leaf, we hung it up to harden. Don't forget to put newspaper underneath where you hang them, to catch the drips!


 After we finished dipping leaves, Noodle enjoyed playing with the wax as it began to cool again. He especially liked it when it was no longer liquid, but not yet hardened... the stage when it is warm, soft and pliable. He spent quite a few minutes molding it like playdough!


We are looking forward to trying more beeswax crafts soon... we might even try making our own candles!

Friday, September 28, 2012

Pumpkin Spice Oatmeal


One of my favorite things about Fall is all those delicious Autumn flavors we get to enjoy this time of year… pumpkin, squash, apples, warm spices… so comforting as the weather gets chillier!

As I woke up to a damp, chilly morning, I decided that the family needed a special treat to get them up and moving for the day, I decided to “Autumn up” our usual morning oatmeal, by adding some pureed pumpkin and spices. The results were quite delicious, if I do say so, myself! So I have decided to share the recipe here. I hope that your family enjoys  this special Autumn breakfast as much as mine did!

Pumpkin Spice Oatmeal

3 cups of old-fashioned oat
5 ½ cups of water
½ cup pureed pumpkin (fresh or canned, either will work fine)
¼ cup flax meal (optional, but I like to add it to boost the nutrition!)
2 tsp pumpkin pie spice
½ cup of chopped walnuts or pecans
Maple syrup

Combine the oats, water, pumpkin, pumpkin pie spice and flax in a medium pot. Cook over medium-low heat, stirring often, until it is your desired consistency. We like ours nice and thick. Spoon into bowls, and top each serving with chopped nuts and maple syrup. Makes about 6 servings.


Thursday, September 27, 2012

Simplifying Your Family’s Schedule


So last post was about the Family Calendar... today's post is sort of a companion post to that one, as I'm going to talk about all the stuff that gets written on that calendar! I sort of addressed this topic before (you can read that post here) but I think since we are now in the time of year where kids school-year activities are all being scheduled, it is a subject worth discussing again! This time, I want to focus on more our kids’ schedules. Kids today have SO much going on! With school, sports, scouts, music lessons, dance classes, volunteering and other activities, some kids are scheduled from the time they get up until the time they go to bed! We all want our kids to have lots of enrichment opportunities, but when kids are over-scheduled, they (and their parents!) can end up exhausted and stressed out. So how do you strike a balance? Here are some things to consider:

Think about your child’s temperament. Every kid is different, and so every kid will have different needs. In our family, both Ladybug and Monkey are VERY social, and they really love group activities. They are happiest during our busy times of the year, when they have their homeschool activities, dance classes, clubs and other activities going on. They love having the opportunity to see their friends and enjoy these shared interests with other kids.  Noodle, on the other hand, is more of a loner, and we find he really can’t handle more than one or two organized group activities per week. Your child may fall somewhere in the middle of these extremes. Consider how much of a “need” your child has for outside activities.

Before you commit to an activity, consider its impact on the family, as a whole. When the kids show interest in something, or an opportunity for an activity arises, we sit down all together and discuss if it’s something we can manage comfortably or not. Remember to consider issues like time commitment, transportation to and from, cost, and whether it will conflict with work schedules, Family Time or other prior commitments.

Set Limits. Generally, we try to limit our kids extra-curricular activities to one activity per day per child (less for the youngest) We figure that this, along with their homeschool stuff, is plenty to keep them occupied and happy, but not over-scheduled. We do have one exception to this. Monkey really loves playing baseball, so we do allow him to play Little League, even though it does mean that during baseball season he often has baseball and another activity on the same day. Since Little League in our town is only from April to mid-June, we’re willing to make that exception.

Don’t forget to allow for some “Downtime” everyday. Every child should have some time each day which is not structured in any way. Time when they can lounge around with a comic book, lie in the grass and watch ants, hang upside down from a tree, build a city with blocks, doodle in a sketchbook or just stare out the window and daydream. Having time to just “Be” is one of the most magical things about childhood, and as parents it is our duty to preserve that time for our kids.

Tuesday, September 25, 2012

The Family Calendar


Fall is a very busy time for most families.  Everything is starting up again, after the quieter days of summer… school, sports, activities, appointments, meetings, holidays and more! It can be hard to keep track of everyone’s different schedules! While we do try hard not to over-schedule ourselves and our kids (more about that, in a future post!) we still somehow end up with lots of activities and appointments to keep track of. I know that lots of people rely on things like online calendars or smart phone calendars to manage their time, but we rely on something a bit more Simple… a big wall calendar, which is hung in a prominent place in our kitchen. It seems to work best for us, as it’s instantly accessible to even the youngest members of the family. To make our calendar easy to read, we use different colored markers for each type of activity. A quick glance from across the room lets us know what’s going on each day.


Black: Work schedules & work-related classes, etc
Pink: Homeschool activities
Orange: Occupational Therapy & Social group for Noodle
Blue: Dance classes
Brown: Baseball practices and games
Green: Doctor and Dentist appointments
Purple: Fun Stuff, like parties, outings, special events, etc


Some families might find it easier to color code their calendar so that each family member is designated a different color.  We have been refining our calendar system over the years, and have tailored it to work for us.  Our Family Calendar is the most-used “tool” in our home. We all look at it every evening, to see what we have going on the next day, and we look at it every morning, as we get ready for our day. It keeps us organized and keeps us from missing important appointments. It helps us to plan our days without stress (or, with less stress, anyway!)

Next post, I’ll be talking about all the “stuff” we all have written on our calendars, and how to keep from becoming a slave to our schedules. 

Monday, September 24, 2012

Homemade Beeswax Lip Balm

First, I must apologize to the Burt's Bees company. I have been a loyal buyer of Burt's Bees Beeswax lip balm for AGES, but I will never be buying any lip balm ever again. Because this homemade stuff is AWESOME.

I've been researching homemade lip balm recipes for quite some time, and there are lots of recipes out in the web which contain multiple oils, flavors, scents, etc. But I decided to Keep it Simple, as is typically my style, and go with just the basics... a pure, clean, healthy lip balm which is inexpensive, easy to make, and works great. It contains just 3 ingredients:

Beeswax: You can purchase your beeswax in different forms... as little pastilles, chunks, bars or in various size blocks. Pastilles are ready to measure and use, but if you buy a block or a bar, you will need to grate it with an old cheese grater before you begin. I bought a 1lb block of organic beeswax, but I only used a fraction of that for this project.

Coconut Oil: I LOVE coconut oil! One of these days, I will write a post on all the reasons I love this stuff. But I digress. I use Nature's Way organic coconut oil.

Vitamin E Oil: This can be purchased at any pharmacy. You won't need much... just a few drops.

You will also need a Pyrex measuring cup, a spoon and something to put your lip balm in. I purchased little lip balm pots, but you can also find empty lip balm tubes online. If you want to be extra frugal, you can reuse old tubes or pots... just make sure they are cleaned really well, first.

OK, here we go!

Measure 3 Tbsp of beeswax into your Pyrex cup. Microwave for 30 seconds. Stir. If not melted all the way, keep putting it in for 10 seconds at a time until it's melted, stirring each time. Next, add 6 Tbsp of coconut oil and stir. If necessary, microwave a bit to melt. Add 2-3 drops of vitamin E oil and stir again. Pour into your containers. If it starts to solidify before you finish pouring, you can just pop it back in the microwave for a few seconds. I got 8 pots of lip balm out of this recipe, but you might get more or less, depending on the size of your containers. Wait until they completely solidify before capping.

If you don't have a microwave, you can probably use a double boiler to melt this. One other bit of advice... I found the cup and spoon a bit hard to clean after... you might want to designate a cup and spoon just for this purpose, as it does get a bit messy.

I love this lip balm as it is, with a light, honey-and-coconut scent, but my daughter wants to try experimenting with adding some other oils for scent. We plan to try this soon, and I will post the results!

Sunday, September 23, 2012

Celebrating the Autumnal Equinox

 Yesterday we celebrated the First Day of Autumn with a Harvest Feast! We had a lovely Fall salad of greens, apples, walnuts and blue cheese, creamy squash soup, freshly baked whole wheat bread and corn on the cob...


 For dessert, we had warm apple crisp and mulled cider, outside by the fire. It was lovely!


May you all enjoy the Blessings of the Harvest!

Friday, September 21, 2012

Best Things About Autumn

Tomorrow is the Autumnal Equinox... the first day of Autumn! I do LOVE this time of year! I might be biased, but I think Fall in New England is particularly delightful. Just for fun, here are ten of my favorite things about Autumn:


1. Crisp, cool mornings
2. Apple picking!
3. Warm, spiced cider
4. Cider donuts!
5. Mums
6. Beautiful, colorful foliage
7. Cozy sweaters
8. Pumpkins and Squashes
9. Scuffling through fallen leaves
10. Snuggling under fuzzy blankets


Tomorrow, my family will celebrate the Equinox with a Harvest Feast and stories and warm cider out by the fire pit. I'm really looking forward to sharing this special time with the ones I love! 


Thursday, September 20, 2012

Beeswax!

Oh my goodness, I'm like kid at Christmas! I am now in possession of a 1 lb. block of organic beeswax! I've been dying to try making my own beeswax lip balm, and have been anxiously awaiting this package in the mail. I'm hoping I'll have time to give it a try this weekend, and will most definitely post the results of this experiment! But I'm a little impatient... I want to play with my new beeswax NOW (see? Kid at Christmas!) But there is work to be done and children to tend to and our Homeschool group's big annual Planning Meeting is this evening (actually really looking forward to that!) so the beeswax will have to wait. ~sigh~

Wednesday, September 19, 2012

Feeding the Family on a Budget


For most families, the biggest household expense after housing is food. Feeding a large family, in particular, can get very expensive, especially if you want to feed your family well. But it is possible to keep food costs down without sacrificing nutrition. Here are my tips for feeding a family on a budget:

Try to stick to a whole food, vegetarian diet. I realize this won’t work for everyone, as there are lots of die-hard meat-eaters out there! But… skipping the meat counter and the packaged, processed food and basing your diet primarily on whole grains, nuts, beans and produce will save you hundreds of dollars every month. Plus, there is a ton of evidence out there to support the idea that a primarily plant-based diet is healthier, anyway.

Stock up on staples when they’re on sale. This is a big one! We buy grains such as rice, oatmeal, quinoa and pasta in bulk, as well as things like cereal, baking staples, peanut butter, canned tomatoes, etc. Anything that will last a long time can be bought ahead, as long as you have a cool, dark place to store it. We have a pantry area in our basement where we store our bulk food. Our setup isn’t anything fancy… just some basic shelving and a chest freezer… but it works.

Buy produce that is local and in season. This will always be cheaper, and it’s fresher and thus, better for you! Consider joining a farm share, or starting a home garden, if you have the space. And when that good, local stuff is in season and plentiful, freeze or can some for use in the winter months.

Make your own snacks. Rather than buying prepackaged snacks for your kids, try making your own! We like to make Homemade Trail Mix, homemade granola and mini-muffins (bake a large batch and freeze for snacks throughout the week!) We also like to pop up a big batch of popcorn, and store it in zip bags or containers for quick on-the-go snacks.

Plan your meals. This is very important. Before you write up your shopping list, make a list of the meals you will prepare that week. By knowing ahead of time what you'll be making, you will know exactly what you need to buy for the week.This will not only save you money by reducing the amount of food that goes to waste in your fridge, but it will also save you from standing in front of the fridge at 5pm wondering what the heck to feed your hungry family.

Make a shopping list, and stick to it. Grocery stores have all sorts of pretty displays to encourage you to purchase more than you intend to. Resist the urge, and stick to just what you really need.

What do you do, to keep your family's food budget in check?


Thursday, September 13, 2012

Homemade Trail Mix


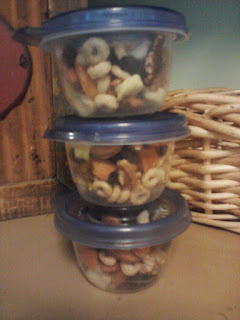
Like most families with kids, we spend a lot of time out and about on all kinds of adventures: classes, activities, sports, outings, etc. I try to keep lots of healthy snacks on hand that we can grab quickly as we’re heading out the door (or even for when we’re at home!) For a quick, healthy snack for growing bodies (and for already-grown bodies!) you can’t beat Trail Mix. Making your own is way more frugal and healthy than buying the packaged stuff, so every other week or so, I make a big batch and then store it in little 4oz containers for quick grab-n-go snacks for the family.  This is the basic recipe I use, though sometimes I change it up a little, depending on what we have on hand for ingredients.

Mama’s Trail Mix

2 cups of O-cereal
1 cup of walnut pieces
1 cup of almonds
¼ cup sunflower seeds
¾ cup of raisins
¾ cup of other dried fruit (we like to use a mix of chopped apricots and chopped dried apples, but any dried fruit will do)

Mix together in a large bowl. Store in single-serving containers.

A note about the nuts: we use raw nuts, but you can use roasted/salted, if you prefer.

Wednesday, September 12, 2012

Encouraging Young Writers


We’re only one week into the Homeschool year, and already our youngest was balking at having to practice writing each day. He has fine motor difficulties, which makes the task of putting pencil to paper a challenge for him, though it’s also the reason why he needs regular practice to develop those skills. In addition, we also want to start encouraging him to express himself creatively through writing. We realized that we needed to find a way to make Noodle WANT to write... to make his writing time something fun, instead of a chore. We came up with a “What Will I Write About Today” jar, with writing prompts typed up on slips of paper. Each day, he chooses one, and that’s his “assignment” for the day. So far, he seems to like it!  


Monday, September 10, 2012

Rustic Potato Leek Soup


We are now into the second week of September, and in our neck of the woods right now, Mother Nature is giving us just a hint of delicious almost-fall-ish weather. Outside, the air is a bit cool, with a nice breeze. This is the kind of weather which makes me want to switch from light, summer-time meals to something a little more… well… fall-ish!

Since we had a whole bunch of potatoes and leeks sitting around from our farm share, I was thinking of maybe a potato-leek soup. I love the flavors of potato-leek soup, but I was in the mood for something a little less fussy… a little more rustic, hearty and simple. This is what I came up with: A potato-leek soup which is not pureed, and definitely not fancy. I left the peels on the potatoes, and tossed in a handful of herbs from the garden. It was quite simple to make, but oh-so-satisfying to eat!

NOTE: You can make this soup vegan, by skipping the butter and increasing the olive oil, and using a non-dairy milk instead of the cream.

Rustic Potato Leek Soup

2 Tbsp butter
1 Tbsp olive oil
2 cups of chopped and rinsed leeks (white and light green parts)
4 cups of diced potatoes
6 cups of vegetable broth
Small bunch of fresh parsley, chopped
A few sprigs of thyme, chopped
½ cup heavy cream
Salt and pepper to taste

Melt the butter in a large soup pot. Add the olive oil and the leeks, and cook, stirring, until the leeks start to soften, but not brown. Add the potatoes, and stir. Add the broth and herbs, then bring to a boil. Simmer on medium-low heat until the potatoes are soft. Once the potatoes are cooked through, use a masher to slightly smash up the potatoes in the pot… not too much, though!  Add the cream, then season with salt and pepper to taste. Serve with a salad and some warm, crusty bread.

Wednesday, September 5, 2012

First Day of the Homeschool Year!


Like many homeschoolers, we view learning as something that is always happening, year-round... But we still get excited for the beginning of the “school” year, just like everyone else! For us, the beginning of the school year marks the return of the few daily lessons we do (mostly math and writing) but more importantly, it marks the beginning of all the kids' fun school-year activities! We are active in our local homeschool group, where we participate in things like a Nature Club, Book Discussion Group, Chess Club.  We also take part in the annual Science Fair, History Fair and Art and Music Fair. Our group also has regular Games Days and various field trips throughout the year, which we very much look forward to. Additionally, this is the time of year when Ladybug and Monkey start up all of their dance classes again. So you see, we have much to look forward to when September rolls around!

Today was officially our First Day of the Homeschool Year. Because school always started the Wednesday after Labor Day when I was a kid, that is the tradition I continue with my homeschoolers! Here is a little glimpse of how our day went: 

We started with a special breakfast… Breakfast Bread Pudding!
The Breakfast Table, all ready!


Happy Homeschoolers, about to eat their breakfast.

The Man of The house put up a little warm-up Math Problem on the board for each kid, just for fun.

After morning chores were done, the kids settled into their first task of the year… decorating and personalizing their binders, which they will use to keep their work together throughout the year.  Each year, we get a new binder for each child, and the previous year’s binder gets filed away, as a record of what each kid did that year. They love to make their binders their own, by decorating them with their own artwork.

Next, each child wrote out their goals and hopes for the coming year.  I will keep these papers in my homeschool binder, and at the end of the year we will look back, and see how much progress they made toward those goals. 

After their work for the day was done, each child got a little “Not-Back-to-School” present.
No, it's I didn't give them wontons...
just a few little chocolates and some stickers, tucked into these cute, tiny little boxes!

It was a nice, gentle start to the year, which was nice for the kids, but also for The Man and I, who have to get back into the swing of juggling both our Homeschoolers and our daycare kiddos throughout the day! So far so good… we’ll see how it goes as the year goes on and things get busier!

Monday, September 3, 2012

Preserving the Harvest


Wow, Labor Day, already!? Goodness, but the summer has just flown by! But the end of summer fun means the beginning of other wonderful things, like Harvest Time! This time of year, pretty much every weekend (and some time during the week, when I can manage it!) is spent canning, baking, freezing and drying… preserving all the good stuff which is overflowing from the garden and farm. Yes, it’s quite a bit of work, but making use of all this seasonal goodness and stocking up for the winter months really cuts down our grocery bill. Here is some of what we’ve been up to the last couple of weeks:

Freezing zucchini, green beans and broccoli
Roasting and freezing squash
Baking and freezing zucchini bread
Canning pickled green beans
Making and freezing tomato sauce
Drying tomatoes in the dehydrator (“sun-dried” tomatoes!)
Making veggie chips in the dehydrator
Peach preserves
Freezing peppers
Making and freezing vegetable soup
Making and freezing pesto

Here’s what we’ll be working on in the coming weeks:

Canning applesauce, spiced apples and spiced peaches
Making dried apples
Drying herbs, for cooking and for making teas
More veggie chips!
More preserves!
More pesto!
Salsa

And maybe more, depending on what Mother Nature gives us to work with!  There is something very comforting in starting the fall and winter months with a well-stocked freezer and pantry. In addition to reducing the amount we need to spend on groceries over the winter, it also means we’re prepared if we end up with a nasty New England storm… if we get snowed in, we have plenty to eat!  

Even if you do not have your own garden, you can still make use of the bounty that is available this time of year. When your favorite produce items are in season, plentiful, and thus, cheaper, buy extra from your farm or market, then can or freeze the surplus for later in the winter. If you are new to preserving food, check out http://www.pickyourown.org. They have lots of great information about canning and freezing, along with step-by-step recipes, to get you started.

Happy Labor Day, everyone!

Sunday, September 2, 2012

Recycled Desk


Yesterday, Ladybug, Monkey, Noodle and I found this filthy, rusty desk by the side of the road. More sensible folks would have probably just left it there. But not us! We saw treasure in that thar piece of trash, so we tossed it into the back of the minivan and brought it home!


 First, we gave it a good cleaning, then we sanded off some of the rust.

Next, we added a coat of shiny blue paint.


Ta-da! Now Noodle has his very own desk in the homeschool area for drawing and for doing his math and writing… just in time for the start of our Homeschool Year!